

All About WoodWorking
Sunday, September 28, 2014
Monday, September 22, 2014
Mitered half laps
.jpg)
I have to make a frame for an upcoming project so I thought I would try make it with mitered half laps. Easy to make and when glued they are very strong. To build the frame I will use an 8 foot 2x6. It will be cut in half then into smaller sizes for rails and stiles.
.jpg)
The easiest way to cut an 8ft 2x6 in half without using a miter saw is with a jigsaw. After it's cut it can be nicely squared up on the table saw with a sled.
.jpg)
The rails and stiles will be 4ft. and 18 inch lengths and 1x3/4x3/4".
.jpg) To cut the lengths I use a Stop block (see video) with strong magnets to sit on the table top against the fence.
To cut the lengths I use a Stop block (see video) with strong magnets to sit on the table top against the fence. .jpg)
The sandpaper holds the work piece very nice.
.jpg)
.jpg)
The fence is set so that distance from the stop block to the blade equals width of the workpiece.
.jpg)
.jpg)
Now the miter gauge can be set to 45°. I clamped the miter gauge in the vise and use a Wixey angle gauge set it at 0 then slowly turned it till it read 45°.
.jpg)
.jpg)
The stile can be cut with just one pass.
.jpg)
.jpg)
.jpg)
.jpg)
Sunday, September 7, 2014
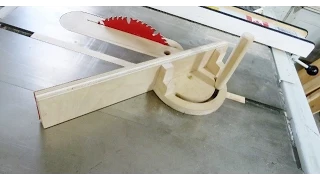
Make a Table Saw Miter Gauge
.jpg)
.jpg)
Maple is a good choice for the rail and I found a piece that was already cut to 3/4 of an inch and fit the t-slot very snug. A little bit of sanding or scraping would make this fit perfect.
.jpg)
The next step is to make a pin for the miter to swivel on. So I used a piece of brass. I cut it to size then rounded the edges slightly and polished it.
.jpg)
.jpg)
.jpg)
I drilled a hole in the rail smaller than the pin then hammered it into the rail. A very tight fit is all you need!
To make the miter I first had to make a platform. I used another pin and pounded it in the platform. I put the piece for the miter on the pin. This would swivel on the pin and make the miter. It was ready for the drill press.
With my drill press and a router bit I cut the slot. It goes slower than a router but not as loud and easy to set up.
.jpg)
.jpg)
.jpg)
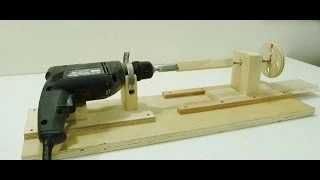
%2B(2).jpg) The handle was made using a dowel and a piece of threaded rod. I also added some wooden angle brackets for more support.
The handle was made using a dowel and a piece of threaded rod. I also added some wooden angle brackets for more support. .jpg)
.jpg) I glued a strip of 150 grit sandpaper to the face of the fence...
I glued a strip of 150 grit sandpaper to the face of the fence....jpg)
I marked and tested the 45 degree angles. Definitely a keeper, I have some upcoming projects in which I will certainly use this gauge.
See also:
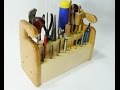
Tool Caddy Make a height gauge Turn a screwdriver Horizontal drilling


Tuesday, September 2, 2014
How to give lumber an old saw mill look
.jpg) To give lumber an old saw mill look I used an old saw blade and bent a couple of teeth. This will give you boards that look like they came out of an old barn.
To give lumber an old saw mill look I used an old saw blade and bent a couple of teeth. This will give you boards that look like they came out of an old barn..jpg) |
.jpg)
.jpg)
.jpg)
.jpg&container=blogger&gadget=a&rewriteMime=image%2F*)
I put a small screw into a piece of plywood protruding 1/16".
To get an accurate reading I measured it with a caliper.
%2B(2).jpg) I used a piece of maple and with a hammer I pounded the saw blade.
I used a piece of maple and with a hammer I pounded the saw blade.
I took quit a few hits to get the bends I wanted.
.jpg)
.jpg) I installed the blade and was ready to test the blade. Below is just one example of the texture I got. I tried many different woods and got many results. I guess it depends on blade height, type of wood and maybe the speed you push the wood.
I installed the blade and was ready to test the blade. Below is just one example of the texture I got. I tried many different woods and got many results. I guess it depends on blade height, type of wood and maybe the speed you push the wood.
Now I have to find some projects to use this wood!
.jpg)
To get an accurate reading I measured it with a caliper.
I used a piece of maple and with a hammer I pounded the saw blade.I took quit a few hits to get the bends I wanted.
Now I have to find some projects to use this wood!
Subscribe to:
Posts (Atom)