Friday, December 18, 2015

Magic knife holder


Originally I made the magic knife holder for knives but also found it handy in the workshop for tools. Children are also having fun with it, putting on spoons and metal toys, so I had to make 2 of them. I will probably make a few extras for gifts.


           For the base I cut some mahogany and glued two pieces together. 
     This will give me a solid base and will also look better.   


   After the pieces are dried I ran it through the table saw to clean it up and then  tilted the blade and cut some bevels on it, this gave it a more pleasing look.                                                                                                           


The next step is to build the slide with the magnet. Basically it is just a small block of wood that fits the magnet and a hole to slide on the dowel. 
                                                                                       

 The two pieces below are marked, clamped and drilled together, this will keep   everything lined up and straight.                                                                                                                                                                        


To install the magnet first mark the position where the magnet will go and make a center punch mark, I used a forstner bit and tapped it to get the mark. Then it was taken over to the drill press and drilled the depth of the cup.                                                                                                        


A magnet cup is used to increase the attractive power of a magnet, normally it will increase the strength by a factor of 4. Magnets and cups are available at  Lee Valley                                                                                                                               


Note -    a slot is cut in the cup,  this will make it easier to take the magnet out of the cup if you ever have too.                                    


Here is a close up of how it looks. The slide is friction fit and will move along the long dowel easily but with enough grip to keep it in place. 


The spring slide block

The second knife holder I made I used a spring loaded system for the slide. It is similar to my  Dowel stop gauge, and not that difficult to make, just a lot of measuring, drilling and fitting a small spring.   


First drill a hole in the sliding block to fit the long dowel. Next, drill a hole in the side of the sliding block, then place a small piece of dowel in it and drill that one. 


Now drill the block a small amount more then clamp it and drill the small dowel a second time, this will make an oval hole.                                                         

Lastly drill the block a third time and this will be for the spring. I just found a spring and cut off a small piece and tested it and it worked great.                  


The slide with the spring system may be harder to make but it will ensure that in time the slide will always have a strong grip.


The small and long dowels are both cut with my new bandsaw sled . The dowel is glued and tapped into base and the slide block is put on. 


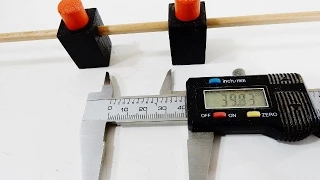
The magic holders are easy to make and will sit nice on the counter in the kitchen or a workbench in the shop. I did not give the measurements for the length of the long dowel since it will depend on how long your knives are. The length I used was around 38 cm.


Here are the dimensions for the spring loaded magnetic slide. For more details please see the video on how it was made.                                                                          


Conclusion


I hope this step by step article and the video will help you build your own.

You can build this easy project in a small workshop or even in your kitchen with very few tools.


See also:


     Scroll holder                 Kitchen utensil holder                  Country cabinet


Thursday, December 3, 2015

How to Make an Angle Drilling Jig


An angle drilling jig will help do the job.


My Drilling jig recently got featured on Popular Mechanics.  


When you cannot angle your drill press table you have to rig something up. Having a jig would be the best. This jig is simple to make, adjusts up to 45-degrees and locks easy.                                                                             


Material list:                                                                                    

Wood- Small piece plywood  1x4', 3/4 inch                                                                                  
  Hardware-4 trim head screws                                                                                                   
     1 foot of 3/8"threaded Rod                                                                                                    
    2 knobs                                                                                                                                   

 Tools:                                                                                                                                      
 Table saw                                                                                                                            
Band saw                                                                                                                           
Drill press                                                                                                                          


 A  Dowel Stop Gauge is used to measure the drill press table top (195cm) then transferred over to the table saw to set the fence.                                     


The sides are traced from a previous jig I made. This was for the            
  Candle and match holder to drill angled holes for the matches.      


At first glance the angle hole looks difficult to drill,  but using the jig made it very easy.                                                                                                  


Marking and cutting the pieces are done on the bandsaw and table saw. There are many ways to make these cuts but for speed these 45-degree cuts are easiest cut on the bandsaw. They can always be cleaned up with some sanding. 


The pieces are laid out.....  now the fun part of putting it all together.


Trim head screws are used for the tabletop, the small diameter head allows for a somewhat clean finish. The other screw shown is a regular wood screw and these would always have to be countersunk.                                          


These screws resemble a finish nail in appearance and function. A
Robertson screwdriver is used for these screws and have a #4 head
 permitting the screw to be countersunk like a finishing nail.


The clamp


To make the clamp a 1 foot 3/8" threaded rod is used, it is cut to size and the ends are  cleaned up with a belt sander. This will help so the nuts will go on freely.                                                                                                       


Wooden knobs with nuts inserted are used for the 
threaded rod. These are homemade but local hardware
stores sell similar types.


 A pencil was taped onto the bottom board and the board was raised and lowered to give an outline for the slot. A compass would be difficult to use since the center would be the end of the side.                                                                                   


After it was marked the sides are taken apart and a slot was drilled and cut on both of the  pieces.                                                                                                   


Some spacers were added to the rod to make clearance for the table top.


Setting it up and testing it out. A block and clamps are used for support for the workpiece. The jig was tested on several scrap boards, different angles and positions were tried and everything turned out great.


See Also:

       I-Beam Drill Press Table            Vacuum Hose Holder              Height Gauge