Friday, June 24, 2016

Calipers-how to build your own

When it comes to measuring in your shop you can't beat a caliper. I have several and use them all the time. Calipers are accurate and precise and can be locked at any distance.


I even built myself a 28 inch Caliper , it was one of my first videos so it was not very good but the caliper is very good and I still use it.    


I will build another one, this one will be around one foot long and I came up with an idea to modify it.  The main scale will be able to lay flat on a surface and the sliding jaw will move freely. This will let you use it similar to T- square and you will be able to mark things easier.


Start with some maple


It is best to use hardwood for this project it is harder to work with but will  withstand a lot of abuse and last a long time.                                           

A thin strip was cut, but I cut it larger than I needed because it makes it easier to work with, then when I have what I like I will trim it down later.


A dado blade was used to cut a slot in the wood and this was cut the exact same width as the ruler. I made a very precise cut so it would fit very snug in the slot.


Now the sides of the ruler can be cut, I set the blade to 10 degrees.


This operation can be done easier using a router but I did not want to set it up. I can do the same job on the table saw but it is more difficult. 

If you take your time and carefully measure you can do the same.


A chisel was used to clean the slot. As it was being cleaned the ruler was inserted and tested regularly to make sure the fit would be perfect.  


A perfect fit.......                     


 Preparing the jaws


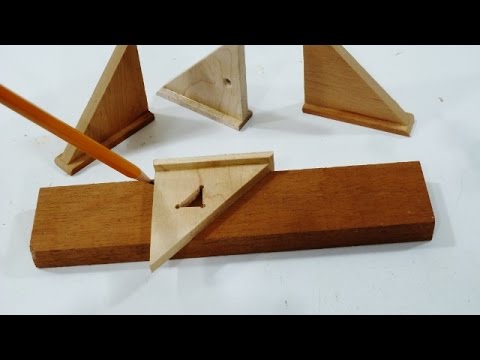
 With the ruler in the slot I found the best location for the jaws and traced them on. I used my large caliper as a template.


The small jaw could not be taken off the large caliper so I just fliped over the large jaw, traced part of it and got basic design as shown below.


I cut both jaws down the middle to thin them down a bit. The 2 pieces of the small jaw will be glued back together later.


A hole is drilled in the large jaw for a set screw. This will be a lock for the caliper. 


Putting it together and how it works                                                                                     

The caliper is complete. A close look at the backside shows how it will work. The set screw is for locking. The set screw was hard to turn in the hole which is good all it needed was some lubricant. I added some micro fine teflon powder and it worked great.

Tip- Never use oil on wood it attracts dust and dirt and turns gummy, then it will not lubricate.

The small jaw will work like a T-square and the large jaw is flush with the ruler and will be able to slide freely. 


In the video I show how accurate the caliper is and use a digital caliper for testing.
I also marked these 2-6 inch squares very fast and accurate.


Conclusion                   
                                                      
Calipers are a must have tool for any shop. For me, I will be using these all the time. Personally I think they are a big improvement. 
I hope this article and the video can help you build your own.


See also                                                                                            


Build a large compass       Mini speed square      Make a miter gauge                                                                            


Friday, June 10, 2016

Make a workshop air cleaner


Dust collectors and vacuums work alright for the shop but if you want to control the fine dust an air cleaner will do a better job.

With some plywood, an inexpensive fan and some filters you can build your own air cleaner for your shop.      


Here are a few other air cleaner builds that are worth checking out. They are all fine workmanship and each go into some detail about their system. 


Let's begin!                                                                                                
                                                                                        
A box fan can be purchased for around $20.00. The one below is a powerful fan and has three speeds.


I will be using two 20x20x1" filters for the air cleaner.  

The filters are wrapped in these papers with lots of fancy words on them.

The Trueblue is a basic cheap filter. It filters larger airborne particles and  has a FPR 5, (filter Performance Rating) which is a rating for this filter. 

The other filter 3M, is more expensive and says it is a Micro Allergen Filter. It has a filtration level of 1000.


First we must take the fan apart.                                                                         

Take off one of the front panel to gain access inside then with a thin slotted screwdriver pry off the dial knob and the handle. If you inspect it carefully you should be able to see how these parts  are attached. 


I used my large caliper to measure the outside of the fan. It is 20.5 inches square. This will make it easy to cut 4 exact pieces for the box frame.


I will use regular plywood with for the box. I went to the lumber store and got some plywood with one side sanded smooth. I wanted to keep the cost down.


                  On one of the sides a couple of slots are marked and cut for the filters. They are slightly bigger than an inch and the height will be around 21 inches.


                   The best way is to cut what you can first on the table saw then with the jigsaw. Also clamping the piece when cutting with the jigsaw will make things easier.                              


A dado stack was used to make these blind rabbet joints, they are a nice looking joint and are very strong. To make them takes a little bit of measuring but using a test piece makes thing easier.


A front panel was cut first on the table saw then using a jigsaw to do the round edges. The table saw helps keep the cuts nice and straight. If you cut with a jigsaw alone the cut will look wavy!


A hole is drilled into the top piece for an extension for the knob. 
A set a calipers is a good idea when measuring to line up the switch on the fan.


 The brass rod was measured and cut with a hacksaw to the right size to fit the new wooden dial.


I did not to buy hardware so I will make my own. It does not cost anything to make since I used scraps plus it is more fun to make your own. 


The hardware is added. I used four large Robertson screws for the handle. It will have to lift the box so I wanted to make sure it was secure. The dial knob was fitted to the brass tubing and pressure fitted on the fan switch.


Some scraps are used to make the guides for the filter. They are spaced a little over an inch so the filter will slide nicely. After the glue is dry they can be screwed into the box. 


The top and  side of the air cleaner....


                                Another side pic.....


                            The filters are very easy to remove, here is the back showing one filter pulled out a bit. I may cover the side slots if I think to much air is going through it. 


Conclusion                                                          
                                                       
Making a filtration system is not that hard, it is basically a box built around a fan with some slots in the back for the filters. 

Keeping your shop and air clean is important for your health especially  if you spend a lot of time in the shop.

I hope you can copy or use some of the  ideas and build your own air cleaner.
Let me know what system you have and how it is working.


See also                                                                

   I-beam table                  Make a blast gate                Vacuum hose arm