

How to cut wood circles? Most woodworkers will have to cut circles, partial circles or arcs from time to time. Cutting circles can be done many different ways using many different tools. It is nice to have plenty of options.
For example you can use a:
- table saw
- bandsaw
- jigsaw
- router
- handsaw
For some of these tools you can cut free hand by following a outline but this way is not very nice.
To be precise a jig would work best.
John Heisz shows us how to make perfect circles on a router with his circle cutting jig.

I also made a Router circle cutting jig using a similar setup I am about to show you, but it will be updated and better.
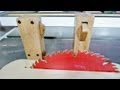
I wanted to try something different so I thought I would try a jigsaw. This jig will be very simple to make and you will be able to make small and large circles even up to 4 feet.
In this article I will show you how to make the jig for the jigsaw and how to use it.
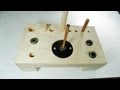
Building the pivot dowel
I first started with the dowel, this will be for the the threaded rod. I used my bandsaw sled to cut a 32 cm DIA dowel 45cm long.

A hole was drilled through the centre of the dowel for a coupling nut. To do this safely I used a v-block to keep the dowel straight and a push stick for support while I was drilling it.

A coupling nut was inserted into the dowel. First it was tapped in a bit with a hammer then a vise was used to push it in all the way. Doing it this way will help to prevent splitting.

I bought various types of snaps and tested them out.
They are available at Home Depot , and are inexpensive costing under one dollar each.
Screw snaps and Stud snaps will both work depending on your project. The screw type will screw into a piece of wood while the stud snaps should be glued onto a wood disk then with two sided tape it can be placed onto your work surface and when you remove it later there will be no marks.

A hole is countersunk in the dowel and this will be for the stud snap. By countersinking the snap into the dowel it will sit better on the workpiece. I used some CA glue and a small Robertson screw to put it together.

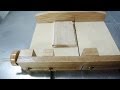
Building the Jigsaw base
1/4 inch Baltic birch is used for the base of the jigsaw. The jigsaw was placed onto the wood and the bottom was outlined and ready for cutting.

I used a piece of oak for the sides. They were cut on the bandsaw and I knocked off the edges which made it look better.

The jigsaw was placed on the board and the sides are carefully clamped tight against the jigsaw sides. This will help make a nice tight fit.

I removed the bottom soleplate off the jigsaw. It was very easy since it just snapped on.

Making a long drill bit
I did not have a drill bit long enough to drill through the base for the hole for the threaded rod. It had to go through both sides to make it line up exactly. To do this I made my own bit out off a smaller piece of threaded rod I had lying around.
I just cut the piece about 8 inches long and put it on my belt sander and ground the tip until it made a sharp point. This did the job quite nicely. After the pilot hole was drilled with the new bit I used a regular drill bit to match the right size for the large threaded rod.

Threaded rod in the dowel. The dowel and coupling nut will turn very quick on the threaded rod and give you an accurate measurement fast.

Here is a shot of the rod bolted to the side of the base. One nut on both sides is enough to keep it secure.

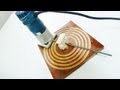
A couple of disks are cut out using a hole saw. They can either be taped to the workpiece or screwed down.

Most woodworkers will have to cut circles or partial circles. This handy jig will work for most jigsaws. The snaps make it simple to use and the threaded rod and dowel makes it simple to adjust. It can be adjusted to as long as you want.
(as long as your threaded rod).
If you build one let me know how it goes or if you have another design please let me know how yours works. Good Luck!

Cutting groves Quick stop block Make a dowel station
Great work. This is a good way to use a jigsaw to have a circle cutting. The preparation takes some time to complete but I can see the stability and how tightly those parts fix together. How long did it take you for planning this kind of operation? I have learnt some new tool using skills in this post. Thanks for sharing.
ReplyDeleteVery nice style and design and wonderful content material , practically nothing else we need : D. https://royalcbd.com/product/cbd-oil-250mg/
ReplyDelete
ReplyDeleteliposuccion douce Tunisie
On the off chance that the edge is excessively sharp. The first occasion when you use them, they may part or chip, consequently demolishing the cutting apparatus for additional utilization. find more info
ReplyDeleteIt is a saw intended to cut various kinds of metal. It is equipped for sawing through strong metal lines, aluminum rails, and even copper. All metal saws have one primary reason, and that is to cut particular sorts of metal for building, and generally are utilized in development settings.
ReplyDeletejig saws
bagi kalian yang merasa sedang cari jasa layanan sms blast kalian bisa gunakan layanan dari https://dartmedia.co.id/ yang dapat kalian coba secara gratis. coba sekarang juga mumpung masih gratis!
ReplyDeletethank you for your interesting infomation. http://woodcuttingtools.pages10.com/
ReplyDeleteMetal Cutting Saw comes with features that can be modified after purchase, if needed. For instance, the chip cutting window can be switched out for a bigger window to allow for more chips to be processed. Cutting Circular Saw Blades metal saw also deters overheating with its cleverly designed ball bearings, allowing you to work for a longer period of time without having to put the saw down or worry about it wearing out from excessive heat.
ReplyDeleteI made a jig similar to this one. The first circle was 40” diameter. My jig is brand new but the saw blade kept travelling outside of the blade guide that is holding the rear of the blade in place….
ReplyDeleteI had paid particular attention to the alignment of the saw to the jig. I thought - OK so I’ll just adjust my pivot hole - the nail that the jig is revolving around - I move the hole about 1/8” to change the angle of the blade travel - just a very little….
Now,,, the blade is climbing to the inside of the blade guide !!!
I tried several different adjustments and eventually just drew the circle and cut it free hand with my jig saw
Bursa
ReplyDeleteMersin
izmir
Rize
Antep
2FV6
Sakarya
ReplyDeleteKayseri
Van
Konya
Samsun
NVSOE
yozgat
ReplyDeletesivas
bayburt
van
uşak
7H8WAL
89A37
ReplyDeleteBayburt Evden Eve Nakliyat
Erzincan Evden Eve Nakliyat
Kocaeli Parça Eşya Taşıma
Niğde Lojistik
Tunceli Lojistik
6B984
ReplyDeleteTekirdağ Parke Ustası
Adıyaman Evden Eve Nakliyat
sustanon
Uşak Evden Eve Nakliyat
Elazığ Evden Eve Nakliyat
Kütahya Evden Eve Nakliyat
buy winstrol stanozolol
order trenbolone enanthate
Binance Referans Kodu
013F0
ReplyDeleteAdıyaman Şehirler Arası Nakliyat
Kars Parça Eşya Taşıma
Maraş Evden Eve Nakliyat
Bilecik Evden Eve Nakliyat
Ünye Oto Elektrik
Afyon Parça Eşya Taşıma
Erzurum Şehirler Arası Nakliyat
Uşak Şehirler Arası Nakliyat
Çerkezköy Çekici
E986E
ReplyDeleteÇerkezköy Boya Ustası
Urfa Parça Eşya Taşıma
Ordu Lojistik
Tekirdağ Lojistik
Batıkent Boya Ustası
Çerkezköy Parke Ustası
Isparta Şehir İçi Nakliyat
Kastamonu Parça Eşya Taşıma
Amasya Parça Eşya Taşıma
D8743
ReplyDeleteÜnye Organizasyon
Konya Parça Eşya Taşıma
Mefa Coin Hangi Borsada
Gümüşhane Lojistik
Uşak Şehir İçi Nakliyat
Muğla Şehirler Arası Nakliyat
Yozgat Şehir İçi Nakliyat
Rize Parça Eşya Taşıma
Çerkezköy Oto Lastik
51F9B
ReplyDeleteKeçiören Parke Ustası
Kastamonu Evden Eve Nakliyat
Silivri Çatı Ustası
Erzincan Lojistik
Siirt Şehirler Arası Nakliyat
Yenimahalle Parke Ustası
Siirt Evden Eve Nakliyat
Çerkezköy Televizyon Tamircisi
Ort Coin Hangi Borsada
A1197
ReplyDeleteSilivri Çatı Ustası
Eryaman Alkollü Mekanlar
Okex Güvenilir mi
Huobi Güvenilir mi
Çerkezköy Motor Ustası
Bitlis Evden Eve Nakliyat
Kilis Evden Eve Nakliyat
Kocaeli Evden Eve Nakliyat
Referans Kimliği Nedir
48603
ReplyDeletereferanskodunedir.com.tr
A1DFB
ReplyDeleteBitcoin Çıkarma
Yeni Çıkacak Coin Nasıl Alınır
Madencilik Nedir
Coin Madenciliği Nasıl Yapılır
Coin Nasıl Oynanır
Bulut Madenciliği Nedir
Mexc Borsası Kimin
resimli magnet
Btcturk Borsası Güvenilir mi
D0E7B
ReplyDeleteCoin Madenciliği Nasıl Yapılır
Kwai Takipçi Hilesi
Jns Coin Hangi Borsada
Bitcoin Oynama
Bitcoin Kazanma
Kripto Para Kazma
Mexc Borsası Kimin
Lovely Coin Hangi Borsada
Star Atlas Coin Hangi Borsada
33C62
ReplyDeleteücretli sanal show
7D383
ReplyDeletegüvenilir sanal şov
D5628622CE
ReplyDeletemaxman
skype şov
canli cam show
novagra
canli web cam show
cialis
lifta
geciktirici
green temptation
422922B09A
ReplyDeletecobra vega
viga
whatsapp görüntülü show güvenilir
skype şov
sinegra
lady era
vigrande
cam show
görüntülü şov whatsapp numarası
Pi Coin is a cryptocurrency that can be mined using mobile devices, offering users the opportunity to earn digital currency without high-energy costs or expensive equipment. As the project grows and progresses towards its mainnet launch, users are increasingly interested in selling or trading their Pi Coins. Pi coin sell.
ReplyDelete3037150616
ReplyDeletetürk takipçi instagram
Spotify Premium mod apk is a modified app offering premium features like ad-free listening and offline downloads for free but comes with security and legal risks.
ReplyDelete7A5E7AEB47
ReplyDeleteTelegram Coin Botları
Telegram Coin Botları
Telegram Para Kazanma Grupları
Yeni Telegram Mining Botları
Güvenilir Telegram Farm Botları
DB61634941
ReplyDeleteTelegram Madencilik Oyunları
Telegram Para Kazanma Botları
Telegram Güvenilir Coin Botları
Telegram Coin Kazandıran Botlar
Telegram Güvenilir Coin Oyunları
234A5AF2E8
ReplyDelete-
-
kuşadası eskort
-
-
179A5ACE51
ReplyDelete-
-
https://kusadasiguide.net/
-
-
811E6C8E47
ReplyDeletekiralık hacker
kiralık hacker arıyorum
kiralık hacker
hacker arıyorum
kiralık hacker
87BE498978
ReplyDeletekiralık hacker
kiralık hacker arıyorum
kiralık hacker
hacker arıyorum
kiralık hacker
That’s a very creative jig setup, I like how you explained the process step by step, makes it easy to follow even for beginners in woodworking. Precision really makes a difference when cutting circles, and the way you combined tools here shows a lot of practicality. Speaking of practical solutions, hoje em dia também é possível executar YouCine em seu PC para ter acesso a filmes e séries direto na tela grande, trazendo a mesma ideia de facilitar a vida com mais conforto e eficiência. Both in DIY projects and entertainment, having the right tools makes all the difference.
ReplyDelete472558D0ED
ReplyDeleteTakipçi Satın Al
20 Abone Hilesi
1000 İzlenme Hilesi Tiktok
500 Abone Hilesi Ücretsiz
Güvenilir Takipçi Hilesi Ücretsiz
Tiktok 1000 Beğeni Hilesi Ücretsiz
1000 Takipçi Hilesi Instagram Ücretsiz
Instagram Video İzlenme Hilesi 1000 Şifresiz
Tiktok Beğeni Hilesi Şifresiz En İyi 100 Çalışan