A compass is often used as a symbol of precision and discernment.
I like to use a compass for woodworking, the points
make it easy to get precise measurements and for
marking distances repeatably and very accurately.
How toBuild a Large Wooden Compass !
To start I found nice piece of oak with some interesting grain, I will cut this for the legs. Since the compass will be large I will cut them to 13" in length. To get a clean cut I will use my table saw miter gauge .
On the table saw the pieces are cut into strips 5/16"x 1 1/8".
Prototype
I sometimes build a prototype to see if a project will work. I built the one shown here in about 15 minutes and was happy how it turned out, and know I was ready to build a larger one.
I will actually keep and use the smaller one because it works fine.
It will be another addition to my woodworking tools.
The strips of wood for the legs are marked and ready for the band saw and the drill press.
Cutting the shape on the band saw....
A small hole is drilled and a finishing nail is used as a center pin to make the hinge.
Since the hole is slightly smaller than the nail the nail should be carefully pounded in. A small drop of lubricant can be added so the parts move smoothly.
Time to drill the hole for the threaded rod. Since the piece is spring loaded a clamp should be used to secure the piece while drilling.
The same finishing nails for the hinge can be used for the compass points. I have moved the drill press table over and used a screw clamp to hold the piece secure. Use a small level or eyeball the leg to make sure it is vertical prior to drilling.
The head of the nails are cut off and pushed into the base of the legs with a pair of pump pliers.
A threaded rod is installed and a knurled brass nut is put on. A
couple of nuts are put on the ends to keep everything together. This was a very simple woodworking project and one that I will certainly use often. The reach is slightly over 1 foot. I really like many different measuring tools and this one is a keeper. An easy woodworking tool that can be made in less than 1 hour.
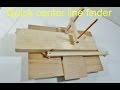
A simple project made with some basic woodworking tools.
You can easily build this with a jigsaw, drill, some drill bits,
clamps and some sandpaper.
Making different size dowels I wanted to see if I could make dowels using a jigsaw and came up with this idea. I have seen and tried many ways but wanted to make one using some smaller tools. Also I wanted to be able to make many size dowels and still keeping the jig easy to make.
This was my first attempt and it turned out great, if I could make this size then I am sure the smaller ones would be easier.
To make the jig- On a piece of 3/4 inch plywood I drew an outline of the front of the jigsaw, this piece will be the plate that will slide along the base of the saw.
Here everything is marked and ready to be cut.
This can all be done with the jigsaw.
I cut several boards so I can have many on hand for making many different size dowels.
The plate in tapped onto the jigsaw until it hits the blade. The saw is then turned on and now the blade will leave a score mark. Then the plate can be laid down on a bench and ready to be cut. This will make it easy to cut a perfect straight line with the jigsaw. This is the cut for the blade... it is made with the jigsaw.
The plate is now ready for drilling. I keep the drill as close to the line as possible. This mark is for a 1/2" bit.
Many holes are drilled and I was ready to make dowels....
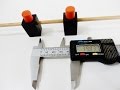
I made several plates and now I can make many size dowels. The ones I made are, 6mm, 9mm, 13mm, and 42mm. This will be handy in my shop and having made extra plates I can quickly drill new holes for any new size I may need.
The drill did shake a bit when I making the dowels but this was not a problem. Of all the
ways I have made dowels I find this is the best way because the jig is small and easy to set
up and and able to make many different sizes. Here are a few ways to make dowels.
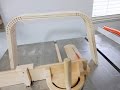
A new shelf on my wall..... I took this photo in my workshop but will be moving the shelf into my house.
After making theMiter kerf jigin my last video I wanted to make a project using the jig. A shelf with round corners would be a good test. I didn't know how hard it would be but I am always up for the challenge.
I carefully marked a piece of plywood using my dowel stop gauge getting ready to cut the kerfs. The shelf will be 12" x18", and every corner will have 12 kerf cuts and they will be 1/4" apart.
The first kerf is cut at 8 1/4" from one end. This cut is made without the kerf jig so it can fit the jig. After 12 cuts the next set will be 12" further down the board then 18" and so on....
In the last video I tried bending this piece and although it did
bend it started to splinter. To avoid this I needed to add some
steam.
A simple solution for steam is with a kettle. Within a few
minutes of steaming the board bent effortlessly.
I forgot this step ealier but the two ends have to be cut at 45
degrees so they can be glued together. Here I am using my

-001.JPG "large wooden compass")


.JPG)
.JPG)
.JPG)
.JPG)
.JPG)
.JPG)