Tuesday, July 28, 2015

I-Beam table for workbench or drill press


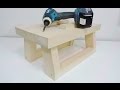
                              Make this small sturdy I-beam work table. Easiest ever to make
                             and a very useful tool in any shop. It is very strong and  can even 
                             hold my weight. It has many clamping possibilities and can clamp
                             many different size parts as well as very small parts and will fit
                             securely on a table or drill press table.


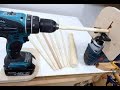
                              To start  I found some old plywood that came from a cabinet that
                              was well over 40 years old  and it was very good quality. I glued
                               some pieces together and got a thickness of 1 1/4 inches.
               
                               The pieces are cut to L 7"x W 8".
                               The middle support piece is 3.3"
                               The table height is 4.25"


                               I installed a dado blade into my saw and ran it through a couple
                               of times to get the right thickness of the plywood. 


                               The depth of the cut into the top and bottom boards was 0.6".


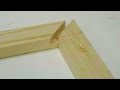
                          On purpose I made the dado a tight fit. With some glue and a good 
                          whack with the hammer I now have a very strong and sturdy I-beam.


                               Now to install the insert nuts. This could've been done before
                              glueing but I wanted to lay things out and get a better idea of how
                              things would work and look the best. After I decided I drilled two
                              holes.


                             A hand screw clamp and block are on the table so when I drilled
                            the holes for the insert nuts there would be no tearout. 

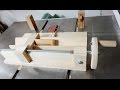
                             Another plus for this table is the hand screw clamp, they do not 
                            work very well on a drill press table but fit very nice on the I-beam
                            table.    


                               A close up of the insert nut. I used an Allen key to turn it in. It
                               may seem difficult but in fact is very easy to do.


                                 I used some clamps and secured the I-beam table to  my workbench.
                                 I put on a small vise using some Phillip screws and turned them into
                                 the insert nuts. This is put together very quick and easy. I even tried
                                 it on my kitchen table and it worked great and did not mark anything!


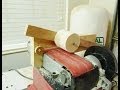
                               Now to the drill press
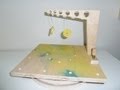
                              I made a few hold down clamps out of maple and some T-nuts
                              at one end. The clamps are holding a Canadian dime and after 
                              tightening the screws the dime would not budge.

                             
                              Philip screws are in the insert nuts and lag bolts are in the T-nuts.
                              Now there are many possibilities for clamping parts.
                               
                             The I-beam table is clamped to the drill press table. It can be
                             turned over and now we  have a whole new table. 


See also:

                       Make a large compass         Make a Spline Jig                   Easy Scrap Bin


Sunday, July 12, 2015

X-Carve CNC Machine


       I received a CNC machine from Inventables for free in exchange for a review. I don't 
       know anything about CNC machines but I was up for the challenge to build and use 
       one. I was at first intimidated by all the parts and instructions but everything turned out 
       alright.


                             The unboxing 
                             Everything was well organised and labeled. I laid out all the parts 
                             and slowly started building. Some times some of the instructions 
                             did not make sense but I reread and watched the videos and things 
                             fell in place.  


                              Assembly

                              Here I will show a few tips that helped me with the build.

                              To speed things up I put an Allen key in my drill and tightened 
                             all the nuts and bolts in no time...


                                Make sure the clutch on the drill is set to the lowest setting. Any 
                                additional tightening should be done by hand.


                              Small parts can be held with  needle nose pliers to get in those
                              tight spots.


                               I used a small vise with wood and leather jaw liners so it would not 
                              damage any parts. This made things easy as it would act like a third 
                              hand.


                                The waste board  is flipped upside down and threaded screws
                                are put in. This can also be done with a power drill and a hex
                                bit.


                              After a few tries on some scrap wood I  carved the Inventables  
                              name on this piece of oak. I am slowly getting the hang of it and
                              now will come up with lots of new ideas.


                               A small box is made with the piece I just carved and this will be
                               for the workbench for small parts and some of the tools that I will
                               use regularly. 


See Also:

         Make a large compass           Make dowels with a Jigsaw          Mitered half laps on table saw


Monday, July 6, 2015

Towel holder for man cave


                                  A towel holder for a man cave with a unique wood design  will
                                 look good in the workshop. It would also be nice and handy to have a
                                 towel or rag hanging around.


                               Cutting srips of wood
                               Strips of wood are cut too different sizes. For a good contrast of 
                               woods I used oak, maple and Brazilian cherry.


                                Glueing
                                After laying out the pieces I saw what I liked. Then glue was 
                                brushed on and the pieces were clamped for a few hours. I 
                               used my wooden clamp since it was the ideal clamp for this job.


Making the ring
I used some extended vise grip clamps and secured the piece to the
 drill press table. I recently bought a circle cutter and wanted to try 
it out, it did its job but was very slow because of the hardwood I used. 


    After awhile it was still cutting but it took too long so I decide to
   finished it with the jigsaw. This went quicker but not as clean.


                                           After the jigsaw it needed more cleaning so I  used
                                           my Oscillating sander . The sander may look like an 
                                           odd set-up but it works great!


To finish the ring and round the edge I used a router and a 1/4" Roundover bit. This will make a very nice ring.


Lightning bolt  
  Using the same pattern as the ring new strips are cut glued and set
   aside. The strips are around 14 " long.


     A lightning bolt design is cut on the bandsaw, and cleaned up
     with a belt sander.


                                  With some of the leftover cut off pieces a square was cut and a 
                                 hole was drilled and then the piece was cut in half. This will  hold 
                                 the ring. 


Finish
Waiting for the glue to dry.  When it is ready the block  can be
attached with 2  drywall screws to the lightning bolt piece.
For the finish I brushed on 2 coats of Varathane.


 Everything is put together it's time to test it out, then with 2 sided tape
I can  find the right  place in the shop to put it .


See Also:


      Finishing turntable                       Make large dowels                       Make mini workbench