My drill press lever had a good workout when I made my Wood pipes
and wood scroll holder. I used a hole saw and cut plenty of circles. It took
some time and I was forever holding the lever and applying pressure. I
thought what if I could add a weight and let the lever do most of the work
by itself!

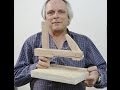
To start I will first make a handle and this will hold some weight.
I found this pipe in my shop and cut a piece off with my angle grinder.

Because cutting free hand is not that accurate I put it on the belt sander
and squared it up. It was very easy to do and it turned out perfect.

Then maple end caps are made with a hole saw.....

I did not have a hole saw to match the inside of the pipe handle
so I cut a larger circle and will sand it down to get the right fit.

Now I am sanding the edge of the cap and testing it frequently to get the
right size. It has to be a tight fit because it will be holding lead.

The cap is on, I used a vise to compress it in the pipe.

Now it's time to add some lead, when it was full I used a pipe and
tapped down the end cap. I place a washer on top of the cap so
when I tapped it the maple cap would not split.

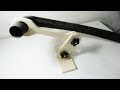
The threaded rod I used is 3/8", this is what fits the drill press. To
cut it I placed it in the vise and used my vise jaw liner so I would
not mark the threaded rod.

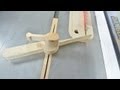
The handle is finished and a wingnut is put on, it can be adjusted
to different lengths along the threaded rod to change the weight.

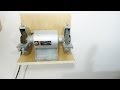
The drill press at work. I was able to do other things in my shop while
it was cutting.

I tested many pieces of wood and saws and found no problems.
This would work best with hole saws and I did not try it with
regular drill bits because they would drill too fast.
See Also:
Table saw clamp Circle cutting jig Table saw with safety feature

Dust collector French Cleats Plus Making Dowels