Monday, March 23, 2015

Bending Wood with Miter Gauge Kerf Jig


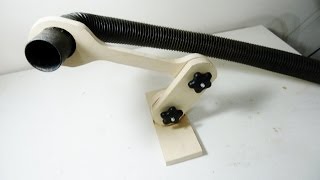
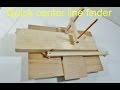
Bending wood can be done easily using this Kerf Jig. This jig will
 allow you to cut evenly spaced kerfs very quickly on plywood or
 any other stock.


  I made this Wooden Miter Gauge for Table Saw a while back and 
  it works great,  in fact  I use it all the time. With the large back and
  sandpaper it is easy to hold and  secure many different sizes
   of  wood. 

 A small addition for the Miter gauge. 

 This will be a block with a pin that can be easily attatched to the miter
gauge to make a new jig for cutting kerfs.


The first thing to do is make a pin so I thought I would use an Allen 
key.  I have collected many keys over the years and thought I could
find the right size. The key size you need should be the same thickness
 of your table saw  blade, usually 1/8th inch.


I found one but had to  grind/sand it down a bit to get the 1/8".
 You can  use a belt sander to get the right thickness.


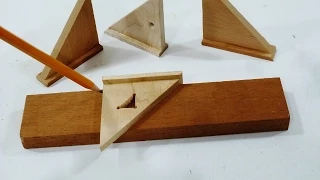
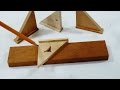
I found some wood in my scrap pile to make a stop block. Maple
 is best but any hard wood should be fine. Rip some  pieces to 
 3/4x1x3 1/4" and the top piece,  3/4x1/2x3 1/4". The top piece 
has a dado the thickness of the miter gauge back. Drill a hole  in
 the center of the block . Make sure the hole is smaller than the 
Allen key for a tight fit.


   Now the two can be put together. The block is glued and screwed
  together. Keep everything square and test on the miter gauge back.


A small notch is chisled out, this is for the Allen key so it will
 sit flush on the bottom of the guide block.


The key is tapped in with a hammer and everything is square
 and flush. I did not glue it because the Allen key fit very tight.
If you have too you can use some  CA glue.


A cut is made for the pin 1/4" away from the blade. This is done

 by raising the miter gauge off the table using some scraps the
 thickness of the runner and moving the miter gauge over the blade.


The depth of the cut should be the height of a Allen key, mine
 turned out to be 4mm.


The guide block is simply snapped  on.

......One small modification.


A second cut is made on the other side of the blade. Now the
guide can go on either side of the blade making it easy to make
cuts on both sides of the stock.


A  close up of the pin, blade and the other slot.
Remember to use a Zero-clearance insert for the saw
to prevent chip-out.


 This is my first try, it went very fast and  the spacing was perfect.
I did not set the blade high enough so the board did not bend that
easily. I tried a second piece and it was cheap Chinese wood and
it crumbled as I was bending it. I caught this on video and it made
me laugh.


This is my third attempt, a better piece of plywood and it turned
 out great. It bent fine but I used some steam from a kettle to ensure
 there would  be no cracking.


I hope you enjoyed this and get some value from my posts. If
you want to build yours and have any questions about the build
 please ask!

Any ideas what I should make out of bent wood let me know, 
 or show me what you have made.   Please comment. 
 This should be fun!


See also:


Make a Multi Blast Gate                                       Make a Mini Speed Square


Make a Screwdriver                                           Center Line Finder                        


Saturday, March 14, 2015

Vacuum hose holder


Easy  to make Vacuum Hose Holder

 I am always trying to find ways to keep my shop clean and control the
dust, so I came up with this idea. A vacuum hose holder with magnets that
can be usrd for machines with metal tops and with it's large base can be clamped
on a workbench. I made something similar a while back but I find this one is easier 
to set up and move around.


Material list 
1   2x4"x 5"
1  1/2"x 5"x 11" Baltic Birch
2  Rare Earth Magnets                        


   Cut a piece of 2x4  to 5" length, I will use my  miter gauge on
the table saw.   Any scrap will be fine, the piece I used is white cedar.


To drill the hole for the hose you can clamp a small piece of wood on    
the table to raise the block. I did not measure the angle, I just
    raised it what I thought would work best. The hole saw used is
    2 1/4" this will be a good snug fit for the hose. 
   

Make some shape for the block.... just draw a curve on one side
 and  with  the scrap end you can copy it on the other side.....


....the block looks good and now can use a little bit of sanding.                                                              


Before the pieces can be glued together a line is drawn on the                                                        
 base and  taken over to the belt sander and sanded to a slight angle.                                                                                                                                                                           
                                                    
                                                                                                    
The base is sanded to the line which is the thickness of the 2x4.                                                         
The angle will help keep the hose position against the table top.                                                        


The 2x4 and the base are now ready to be glued. For most of  my                                                          
projects I prefer Titebond  II.                                                                                                                   
                                                                                                                                             

Drill the holes using a 1 1/4" Forstner bit. This will be for the magnet cups.                                        
The magnet cups are used to increase the attractive power of the magnet.                                             


Install the cups  with screws.                                                                                                                
                                                                                                           
Tip:  V in the cups are made using the belt sander. They are                                                           
  put there if ever the magnets have to be taken out.                                                                
          To remove them they have to be pried out.                                                                                                                                                               


The vacuum holder sits secure on the table saw.                                                                                                


Hose on the workbench. With the large base area it can also
be clamped.    


The hose holder can sit on many different surfaces
but I will use it on the drill press the most.


See also:

                                                   Vacuum hose holder  1      


Self centering drill press jig                                           Make a mini speed square