Wednesday, May 25, 2016

Build a Hoverboard Chair


There are many names for this device such as a self-balancing scooter, self-balancing two-wheeled board, segway or hoverboard. There is no universally accepted name for this device and I like hoverboard the best so I will go with that.     


            My video came out 2 days after Izzy's Adirondack chair
       I think we need to have a race. see his video here.


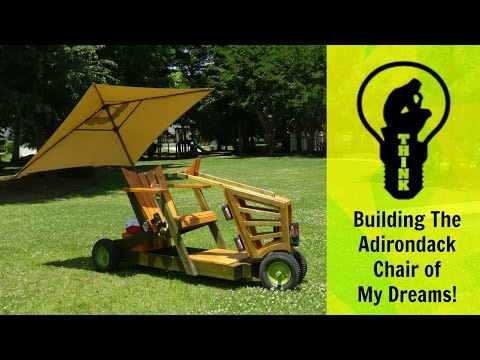
I am not ready to ride the hoverboard so I decided to make a hoverboard chair.
 Making this hoverboard chair out of wood is will be very easy.       


How to build                                                                                                 

  First we need a few measurements of the board. The middle measurement is needed to build the steering and the height will be for the chassis. These numbers will be used to help build the frame and and keep things level.                                                 
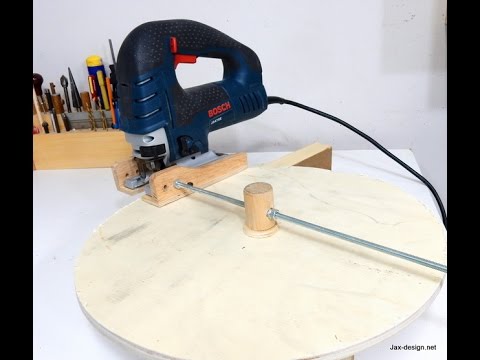


The steering  
Plywood will be used for the steering. Two pieces of 3/4 inch plywood are cut to the shape shown below. 


The two pieces can be glued together. After the glue is dried it can be sanded and the corners can be rounded.                                                           


A hole is drilled in the middle of the block, this will be for a carriage bolt.  

1. Drill a hole first with a forstner bit the depth should be the same amount as the top head of the bolt.
2. Now drill a hole the same size a the thickness of the bolt.
3. Hammer the bolt head until it is buried in the wood.


The frame will be made of a couple of 2x4's. I picked some clean pieces from the lumber store with as few knots possible. 


I found some wheels from a hand truck and since they had bearings they would work fine.


The hole in the wheels is 3/4 inch so I bought some 3/4 inch threaded rod.  The rod was too large so I had to grind it down a bit. To do this I placed it in a cordless drill and turned it on the belt sander. It did not take very much and in no time it fit the wheel. 


The rear end                                                                                              

         A dado cut is made in a piece of 2x4 for the threaded rod. I cut it so the           rod would fit tight in the slot. A pound with a fist will seat it perfectly.


The frame is coming together, I made a dado joint for the sides and a dovetail joint for the chassis. These are not necessary but look nice and are some what stronger. The other way is to just put some large screws.


I knew the width I would use by matching several chairs I had in the house but the length was different on the chairs.

After I decided which chair to use I was able to trim down the sides using a jigsaw.


Plywood is used to hold the threaded rod in the dado slot. The other side will be for the back of a chair.


To keep thing easy I  am using my dowel stop gauge  to layout the bottom before screwing it down.  


For the other side of the bottom another piece of plywood is used. Flipped over this will be the front of the chair.


A block of wood will keep the bottom plywood and the chassis secure. I used some glue and two 3 inch screws on each side. It is important to first drill then put in the screws because the block is small and could split.

A carriage bolt, nut and washers will hold the steering together.


The bottom of the cart


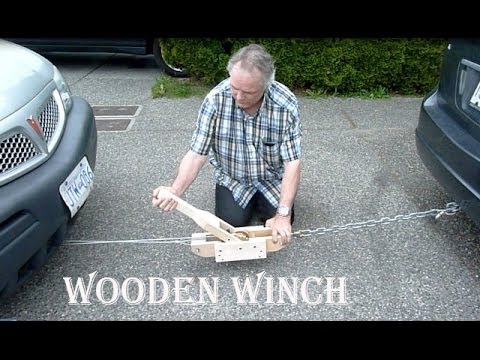
                       Testing it out in the shop


 Conclusion

 The hoverchair was actually a very easy build. A little bit of hardware and a few pieces of wood it cost me no more than $10.00. I had my own wheels but they can be found at a caster shop for around $10.00 each.

The chair works fine in the shop and outside I was able to take it to the end of the street a few times.  If you have a hoverboard I hope these instructions can help you build one.


 See Also:


Friday, May 13, 2016

Build a helping hand/ grabber


A grabber is a great tool for the workshop. With a long reach and a claw for gripping it can pick up even the most difficult looking items. It also has a magnet on the end so you can pick up small metal parts like screws, nails or those tiny drill bits.


I always try using what I find in my shop. I received a bunch of oak flooring from a friend and since it is hardwood it will work fine for this project. 
To start I ripped a small piece for the arm. 


The arm will be 25" long, the height 3/4" and width 3/4". For the dado I set the blade  1/2 inch high and ran it through the table saw moved the fence and then again. This gave me a thickness .35 inches.


                      Here is a template  I traced for the three parts on a 
                      8 1/2 x 11 sheet of paper.

              Grabber       trigger            handle    


The drawing on the board may look a bit rough but I design as I build. Things can always be altered and cleaned up. After cutting and sanding you can make these parts look  great.   


Small parts table saw jig                                                                          

The handle has to fit securely in the arm so I had to build this jig to hold the handle. It will allow me to cut a notch in the handle to fit snug in the arm. 


Now the handle has a correct size notch in it, it fit perfectly thanks to the jig.
It can now be glued together.


I wasn't sure if the handle would be strong enough on the arm so I took a precaution and added some extra sides. I cut two blanks of oak and glue them onto the handle.


After a little bit of cleaning with the bandsaw I took it over to one of  my favorite tools, a small spindle sander. This gave me a nice clean shape.


Time to add the trigger. After I lined it up I made a small mark where I wanted to drill. It is important to use a drill press to keep everything lined up.


Some finishing nails are used for the pin, they should be slightly larger than the hole then they will keep things in line and there will be no play.


Drilling the grabber...


A spring is added to the grabber. You can buy a small one or check out my video here - make your own springs .


A string is attached to the grabber and fed through the arm to the trigger..


 String is tied to the trigger


I tried to pick up my glue bottles and there was no problem


                    A 1/2" magnet is added the the end. I used Gorilla glue to hold the magnet and it worked out fine. I picked up this small drill bit, I tried some smaller bits and other small metal parts and this grabber worked great.

On the end of the grabber I used a small file to make some small notches, this will help give it a better grip.


                                   Testing picking up a pencil.


Conclusion                                                                                                       
                                 
A helping hand grabber is handy for any shop, it will make your life easy and can save your back. I think you will get a lot of use out of it. The magnet and the gripper both  work great. Whether you are picking up a small tool or a small nail. 


This is a handy tool for the workshop or for the home. 

I hope this step by step and the video will help you to make one.                                                                                           


 See also:

     Magic knife holder          Large compass            Mini speed square