A wood ring through a glass bottle will keep people guessing how it was done. This project is fun to make and can be made with basic tools. A jigsaw and a hand power drill would work just as well for this.
I will use a piece of oak to make the ring, it is a strong wood and I like the look of oak.
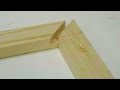
A hole saw is used to cut the inner part of the ring. I
I mounted my router in a vise and safely rounded the inner edges of the ring.
To break the ring!
Using my wooden jaw liners I put the ring in the vice. The liners will keep the piece secure and will not mark the wood ring.
Putting on a hand screw clamp for the upper part of the ring. This
will give me a better chance of splitting it in half.
Hammering the ring .......... I gave it a hit and it snapped
in half right along the grain.
Here is a photo of the two pieces of the ring, I just placed it on the bench and lined up the ends.It turned out great. Now with some titebond glue you should not see any lines at all.
Glueing it together...
An elastic is all that is needed to clamp the ring. I set it aside for a while and then it was ready. Now I can have some fun with it and let people guess how I did it.
Drilling in glass is a new one for me so I will show you step by step how I did it. I thought a good way to start is to make a support for the glass bottle.
I used a peice of 2x4 and cut two blocks the same size. After measuring the top and bottom of the bottle circumference I drilled the holes for the bottle to fit.
A hole saw is best for drilling these holes, please see the video on how I accurately lined up the height of holes.
Material List
Bottom plywood
Ends 2x4
Four 2 1/2 wood screws
This is the basic bottle drilling jig, it was made to fit this size bottle.
Bottles must be measured in length then a jig can be made to fit the bottle you will be using.
Note: First put 2 screws in one block and only 1 screw in the other block... then the one end block can swivel. After the bottle is placed in position insert the last screw.
A piece of plywood is used for the base and here the blocks are being attached. The best way to do this is to make the marks for the blocks and then clamp them so they do not move and then add the screws through the bottom.
Plumbers putty is used to create a dam, this will be for the water. The water will act as a lubricant and coolant for the drilling. Simply roll a piece in your hand and press on the bottle.
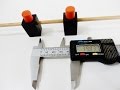
A Starrett 7/8" diamond hole saw is used to drill the hole, I bought mine for about $12.00 Canadian.
A plastic pipette is used to apply small amounts of water. This is simple to use and keep things under control so you don't make a mess.
The overall setup was very easy and the drilling was easy as well. I took it slow and since the drill press was used it was hard to feel and control the pressure so I used my hearing and listened to the sound of the drill.
The dam worked out very nice and after I washed it out it looked like a new bottle... with some holes.
A bandsaw sled is great for cutting very small pieces. Some pieces are difficult to
hold or not safe to cut. This sled is very easy to setup and use. It can cut 45 and 90
degree angles. It also has a stop block so it can make repeatable cuts. The sled is small
so it won't take up to much room in the shop.
Base....Since this will be a small sled for cutting smaller pieces, I did not want to
make a large bulky base so I just used some 1/2" Baltic birch plywood.
The Runner.....
The runner should be a hardwood so I was lucky and found a piece of oak that fit nice and tight in the slot. I just took it over to the table saw and shaved off a very small amount. I retested it and it fit fine.
I used my table saw clamp to make a precision cuts for the sides and the depth of the runner.
The two pieces can now be glued together. I use some Titebond and did not put any screws in it because it was not necessary since the two pieces would not come apart.... unless you smash it.
Fence
The next part is to make the fence and stop block. Here I am cutting a groove in the fence and that will be for the stop block.
Drilling the fence on both ends for the machine screws. This will be screwed into the base. One side is for a pivot and the other side to secure the fence.
An outline of the fence is marked on the stop block, this will be
cut on the bandsaw. I carefully cut it exactly but still used a file
and some light sanding and then got a very nice fit.
A small hole is drilled to fit a nob. I found a nob in my junk drawer
with a threaded screw and just turned it in the wood. I did not put in
an insert because I wanted the screw to turn tight.
I used a speed square and caliper to measure and make sure everything was square. After that I use some machine screws and attached the fence to the base. The stop block was tested and it slides along the fence and base really smooth.
Now the next hole can be drilled. Again using the speed square I marked, clamped and drilled this hole, now the fence can be secured at 45 degrees.
Note, I did countersink the holes to fit the machine screws making sure everything was flush.
\\
First cut......
Above is my test and first cut and it turned out great......
These are a few of the first cuts I made, I am very happy with this sled


