Friday, January 30, 2015

Woodworking and pianos


                            Pianos are made mostly of wood and sometimes the wood can warp.
                            I am a full time piano technician " jackspiano" and there
                             are times when I have to  do some creative woodworking.


                               The piano is a Bosendorfer grand and I am tuning it to A=440
                               using a Verituner app with an iPad.          


                               As I am tuning I find a problem with some of the hammers.
                              They  make a clicking sound when they are struck. I have to
                              take the piano apart and see where the  problem is.


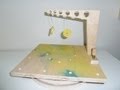
                                The keyboard which is the keys and hammers has to be removed
                                so I can inspect the inside  the piano....


                 With the keyboard out of the way  I see that the pinblock is warped.  


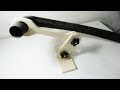
                                  bottom of the pinblock....
 Inside the piano........                                                                        


                                The pinblock has to be planed down so there is enough clearance
                                for the hammer shanks. It did not take much, after around 20 stokes
                                with the plane I tested and it was fine.                                                           


                                Everything is put back together and the  problem is solved, no
                                more clicking and the piano is ready to play.  I don't know if the 
                                pinblock will keep warping but this worked out, I will just have to
                                keep monitoring the piano.


See also:

Make a wooden hygometer            French cleats on steriods                  Finishing table


Friday, January 23, 2015

Oscillating spindle sanding table


                                    My oscillating spindle sander is complete. It fits on the drill press
                                   table and a vacuum can be hooked up easily to the side. The last three videos I                                      made are related to the build.


To make the table I started with some 3/4" Baltic birch for the top and bottom  and cut 2 pieces to 9"x 13". Since I was building a type of box I thought it would be a good idea to make a door so I could store the spindle sanders, this door would also be used for the vacuum.       


A 2/14" inch hole saw is used to drill the hole for the vacuum. This is attached to the box with one hinge. The height of the door is slightly smaller in the frame for clearance. The top and bottom can now be secured to the box.  


A hole is drilled in the top slightly lager than the spindle. This is repeated on the other side with a smaller hole for the smaller size spindles. This is done so I didn't have to mess around with throat plates.


The spindle sanders are stored in the box......... 


Here are both the large and small spindle sanders in use, just flip the table, clamp and ready to be used. This can be done with the vacuum hose left in.


I hope you enjoyed this build, don't forget to comment!


See also:

Making spindle sanders              Dowel stop gauge                            Make a miter gauge


Sunday, January 11, 2015

Making an oscillating sander using my drill press


Oscillating Sander Jig


This may look like a weird contraption but it works... and it is easy enough to set up so I have used it many times with good success. 


I wanted to try hook up my cordless drill to the handle of my drill press to make it work like an oscillating sander for the new spindle sanders  I just made. 

If you want to make one I will walk you through the steps on how it's made.


To make a wood crank I marked and cut some 3/4" plywood. This is the shape I came up with.
Since I used a caliper for the 2 circles I used the marks for the centers so I can later drill these out for the bolts. 


A dowel, a small wooden disk and a bolt are put together, this will  be attached to the crank. It will be for the rope to hang on too.


Here the rope is on the crank handle. The dowel can be moved to different positions on the handle, this will help if you have to change the speed.


One handle from the drill press is removed and this wood ring is added. An elastic band is used so the wood ring will not slide. This will go back onto the drill press and the rope can be tied on. 


The  cordless drill is mounted on the drill press table with clamps. I will use my drill speed controller to get the right speed.


The system works on both forward and reverse. The drill is turning slow so it is very safe. If there is ever a problem all you have to do is tap the speed controller and the cordless drill will turn off.


I tried and tested all my spindles and they all work fine. I am still trying to find out the best speeds and what works for different types and sizes of wood. 


I hope you enjoyed this build, don't forget to comment!


See also:

make spindle sanders                  make a power strip                             dust collector hook up


Sunday, January 4, 2015

Making Spindle sanders for the drill press

I don't have a spindle sander so I thought I would try make some sanders for my drill press. I do use my belt sander and benchtop sander and  use the round edge a lot.

The ones I made here are 1", 1 1/4" and 2". 


With my hole saw I drill into a 2x4 and make some  drums. I  cut three and  stack and glue them onto a 6" x 5/16 Carriage bolt. I put on a washer and a nut. The nut shouhd be tight but not over tightened since it will crack the wood.


  To make sure everything is square I use a piece  of plywood  and some sandpaper.  The drill press column and table are used as  guides for squareness and I can  apply pressure to get a nice smooth finish.

.

To double check the spindle I use a dial test indicator mounted on my table top  to make sure there is no wobble.


 A paper cutter is used to cut strips of sand paper to fit the cylinders.


 I tested a few different types of glues and settled with Elmers Spray Adhesive. Still not quite happy with it but it will do for now.


The sandpaper is spiral wrapped around the cylinders and held together with some elastics.


The large one works the best and I am sure I will be using the others soon.  Although it does not oscillate I find it very useful in the shop and it was a fun and easy build.


See also:                                                                                       
                                                                                                    
Making large dowels with belt sander                                           Making dowels with belt sander    


Circle cutting jig                                                                      Dowel splicing


Back to my Youtube Videos