Saturday, February 27, 2016

How to make mini hacksaw with wood handle

Woodworkers will all have to do some metalwork from time to time. Whether you have to make custom hardware or modify metal to work for your projects. 

A hacksaw is must have tool for any workshop and a mini hacksaw is even better and will be a nice addition to any woodworker's toolbox. And it is fun to make.


I will show you how to make a wooden handle to fit your hacksaw blades. It will be secure in the handle and also be very simple to change. 


This is the mini hacksaw I have had for many years, it has a lot of miles on it and a broken blade. The blade was 10 inches and fits in the handle and can be adjusted to different lengths. I will copy it but change the design of the handle.


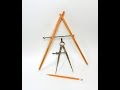
I came up with this design for the handle and actually drew it on a napkin. 


                   I transferred the drawing from the napkin onto my                
                     workpiece. I may make some changes as I cut and                  
                   shape it. At the end of this article there will be a template.      


The workpiece was cut out using the bandsaw. I did make some changes and cut it larger than the original because I wanted to make sure the blade would fit correct in the front. Also it it easier to take off wood than to add.


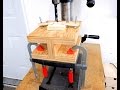
Time to cut the slot for the blade  
                                                              
A narrow slot had to be cut in the handle for the hacksaw blade. To do that a blade was placed between two pieces of wood. A couple of screws are put in to keep it secure. Then some sides are glued on and these will be used as the guides.                                                             


The saw worked fine and gave me a good straight line in the 
bottom of the handle.


                     After the mark was around a 1/2 inch deep I used a larger 
                     hacksaw to cut the slot deeper.              


                    With the new blade in the slot I was now able to glue 
                    in a shim. Remember to push the shim in 
                    enough to keep the new blade firm in the slot. It should 
                    touch the blade.

                   The excess can be trimmed down later when the glue has
                   dried.


A belt sander and a spindle sander are used to clean it up and take away any bandsaw marks. 


                      A small hole was drilled for a nut. The nut was glued
                              in the hole and will be used with a bolt to                                        give adequate clamping pressure for the blade. 


                         A Robertson bolt can be tightened and will squeeze 
                        the wood and clamp the blade. The blade can 
                        now be adjusted to varying lengths.  

                        Don't forget to put in the blade the right way.         


Mini hacksaw template                                                                            


 To test it I cut put a nail in the vise and cut it. The handle was comfortable the tool felt solid making it a very nice mini hacksaw.


Conclusion

A mini hacksaw is a great tool and can even be used for wood.

Because it is simple to make and a good looking tool it would also be nice to make a few and give them away as gifts.

Please let me know what you think, I would like to hear from you.
What projects have you made and had to use a hacksaw?


See Also

Thickness planer     5 easy woodworking projects           Make a compass


Monday, February 15, 2016

How to cut bird's mouth joinery on a table saw- make a woodworker's tool tray


Bird's mouth joinery makes a strong edge-to-edge joint and also looks good for your woodworking projects. 

Do you have tools and parts scattered all over the shop? A while ago 
I built this tool caddy  and I find it useful for keeping my most needed tools close at hand. That's what gave me the idea for the tool tray. 

A tool tray is another way to help keep things neat and organized, and for the stuff that does not fit in the caddy. Although this may be overkill for the workshop I think it looks professional. 

In this article I will show you how to build a tool tray and how to make a bird's mouth joint. Also I will show you how I made a repair on a weak part on the handle.


There are bird's mouth router bits but they are limited to angle and depth so I wanted to do it all with the table saw, this way I will have more options, especially with the wood thickness. To do this I will have to make a new table saw sled.


I will first start with with some oak hardwood flooring I had lying around. These will be for the sides. It is very nice wood but has to be cleaned up. It has tongue and groove on the ends and sides and grooves on the bottom.


I used my wooden miter gauge and a hand screw clamp as a stop block and then cleaned up the ends and got them all the same length.


45 degree sled

To build the sled I used some 1/2 " baltic birch for the base. A miter gauge is used to clean the sides and to make sure everything is square.


For the runner I used a piece of maple. I like to cut it longer than the base so when you place the sled on the table you can see the part sticking out and use it as a pointer/guide to get it in the slot right away.

Washers are put in the slot so when the runner is in the slot it will sit a tiny bit higher, this will help with the glueing. 


Glue is applied to the runner and the board is laid on top then a weight is put on the base for clamping. I have made a few sleds this way and have never used screws. I do this because if you have ever tried to pry apart pieces like this you will find it will not come apart except with great force. 


The sled is ready to be cut but I must tilt the blade.


A wixey gauge is used to tilt the blade exactly to 45 degrees.


Bird's mouth cuts

One of the pieces of oak for the sides is clamped and cut. The hand screw clamp is used as a stop block and the f-clamp will hold the piece that is being cut. It was the first cut and kind of test cut but it turned out fine so I will use it.


Here is the first and second cut of the bird's mouth cut. Notice the first cut is the thickness of the piece.


I continued to do this with for all the four sides.


Walnut will be used for the ends but will be cut so the grain runs long against the oak end grain. This will make for a stronger joint.


Four pieces of walnut are cut, they will be the same height as the sides of the tray. A table saw sled is used for these cuts.


Time to cut a notch on each piece 

Before the sides are glued make sure to cut a notch, this will be for the bottom board.


A strap clamp is best used for clamping this piece. I don't know of any other way to do this.  This has got to be the easiest way since it will allow even pressure to all joints.


The bottom is traced out and cut on the bandsaw. It can then be glued onto the frame.


A piece of oak is used for the handle. It is cut and shaped and will slide on the side of the tray.


I slid it too hard and it snapped at the weak spot. I was afraid this might happen so always remember how the grain runs and how much force not to use. I will make a new one but this time I will  reinforce it with two pieces of walnut.


First I quickly built this jig. It is a piece of plywood and two pieces of wood screwed in and angled at 45 degrees. Then with some screw clamps I held the new piece of oak and cut out a piece on each side the thickness of the table saw blade.


After the new piece was traced out from the broken handle I just sanded the walnut down and rounded the edges with a router and it turned out awesome.

I now have a strong handle and a good looking tool tray.


Conclusion

As a woodworker you'll always learn new techniques and tips.

The handle reinforcement was a good lesson and made a strong joint.

Many times we learn on the way as we build things and I hope this can help you. 

If you know of any other joints for corners joinery let me know?


See Also

    Band saw sled               5 easy woodworking projects                 I-beam table