Monday, January 16, 2017

How to Make an Angle Grinder Holder


Since most woodworkers will have to do some type of metalwork from time to time it is essential  to learn how to cut metal. You may not have all the fancy cutting tools, but there are a few ways to get the job done. 


Hack Saws, grinders and  angle grinders will work but they can be difficult to handle. Cutting bolts or other pieces of metal to the same length can be cumbersome. Most of the times the cuts are never straight.


If you modify your wood bandsaw you can cut metal. To do so you have to put in a metal blade and reduce the speed of your wood bandsaw.


  A quick search online  found that bandsaw speeds for wood is roughly 3000 feet per minute and metal should be around 150-300 feet per minute.


An angle grinder is an easy way to cut metal, the 4 1/4 inch wheel can have a no load speed of 3000-12000 RPM. 

I will show you how to build a jig that will secure your grinder and make a 90 degree fixed miter fence.

You will be able to cut pieces straight to the same length. Oh, and very fast!


Building the jig


A tool I use all the time is my dowel stop gauge here you can see the video . This is very simple, after you have the measurements you can pencil mark them on the dowel of the gauge and then transfer them to the tablesaw when you are ready to set the fence.


                              The base I will be using is 1" thick plywood and measures at,                             width 13 1/4"x length 17 1/2". 


                      A dado was cut in the base the same width as the 
                      table saw slot which is 3/4".


Making the miter gauge


A quick test with a few different miter gauges tells me that the dado cut is correct, it slides nice and there is no side play. If the runner is too tight you can use a block and sandpaper and take a bit off. 


I made this runner test block in the summer and now it's the winter and very dry and the block still fits snug. This is a quick way to set the fence but you may need to refine it a bit.


      The second piece I cut was the miter gauge block or fence, it was cut to the width of the table (13 1/4") and 1 1/2x1 1/4".                   


The runner and block are placed on the table and carefully marked.


The runner is screwed to the block, a speed square is used to make sure everything is square. 


Support for the grinder


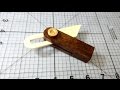
A caliper was used to get the diameter of the angle grinder handle and then cut on the bandsaw. After I got the circle cut perfect I trimmed  down the height of the support piece on the tablesaw as shown in the photo below. I thought this would look better.


                      A 2x4 scrap is used and a piece is cut out, this will be the
                     top support for the grinder handle. Four screws are used to 
                     attach it to the bottom.


Before the grinder is mounted the grinder wheel was pressed into the base. This will work better but ideally the arbor should be inline or be below the piece being cut.  Warning: I never lay the workpiece on the base and cut but use the fence to push the metal and of course hold it with a pair of pliers.  


A stopblock is clamped to the fence and it is ready for cutting. Here is my first attempt and the pieces turned out perfect.


Conclusion

I can't believe how simple it is to cut metal, and with this jig I was able to cut perfect lengths. I could not do that before except with a hacksaw which took me forever! I don't do a lot of metal work but this will come in handy in my shop.

I hope this jig will help in your shop and of course it will save you time and money. Always remember to be safe and have fun. 


Related Ideas


                Can Paper Cut Metal                   How to Make Springs                   Magic Knife Holder


Friday, December 23, 2016

Making Different Size Dowels Fast, New Dowel Maker

Having lots of dowels on hand is great for any woodworker. You can buy them or you can make them. But sometimes you can't get the right size or you need one quick. 

Wouldn't it be nice to make your own, very fast and many different sizes. 


When I was making my  magnetic levitating dowel  I needed a 1/2 inch dowel. I could not find the right size in my stock so I had to make one. I have three different dowel making jigs but they were not accessible plus they take time to set up.    


This is when I tried something different, I used cordless drill and bench vise. I was amazed how easy it worked. Then I went on to experiment with it. 


The bench vise has serrated jaws and when the stock is turned in the jaws they will do the cutting. Then with the vise handle you can adjust the jaws to get the size dowel you need.


The dowels will turn to roughly the right size you need then will need a little bit of sanding. With some practice and a steady hand they can turn out pretty accurate.


Here is a stepped dowel, this is a good example of what you can make. Not too bad for a quick dowel made on a vise.  

Making the dowels

The dowels are not hard to make but there are a few things that will help you:                  
  • The stock must be square
  • must be able to fit in the drill chuck
  • use a vise with serrated jaws                  


I always start with a piece of scrap wood for testing, most of the time this will become the final product. 


A few strips are cut on the table saw, it is important to cut these square. The ends should be sanded a bit, one side to fit in the drill chuck and the other side for a started when it goes in the vise. The knots may be a problem so use only the best part of the wood. 


Here I am turning the wood slow and feeding it slowly in the vise also  I am  using one hand as a guide.


The first two test pieces are complete, they turned out nice and I will be keeping them in my stock. I kept the knots in only to see if they would work.


Large Dowels

Okay, so it works to make smaller dowels but what about larger ones. This would really come in handy.


I used my  wooden miter gauge to cut a piece of 2x2. A small piece would work best since it is easiest to work with.


A center was marked on one of the ends and drilled out. Some creative clamping was done to make sure the hole would be drilled straight. I did not measure the hole but 1 1/2" would be fine.


I used a piece of dowel from the first one I made a glued a piece in the block and set it aside for a while.


The tablesaw blade was adjusted to 45 degrees and all sides of the block were cut making an octagon shape. 


The dowel was placed in the drill and turned on the belt sander rounding the end, this will help later when placed in the vise.


Now it can be turned in the vise. The best way I found was to slowly feed the stock all the way through. Then slide it out, turn the vise handle a small amount and repeat until you get the dowel size you need.

If you turn the vise handle too much on a small piece the wood might twist, and on a large piece, it makes it difficult to turn.


When I had the right size I put a strip of sandpaper, reverse  in the vise and carried on with the turning. In no time it was smooth and I had a good looking large dowel.


 Conclusion

I couldn't believe how fast dowels can be made. I am glad I experimented with different sizes and  woods.


With the right vise with the serrated jaws you can do the same. You may never have to buy another dowel. Remember to go slow and take off a small amount at a time.

Let me know if you try this and how it works for you.


See also:


Sunday, December 11, 2016

Magnetic Levitating Dowel

Now that the Magnet Separator  is complete I can make a fun project. 

I have always been fascinated with magnets and wanted to make some kind of magnetic levitator.


I will try make this one as simple as I can. Although I will use many tools you could get by using just a hand saw and drill. 


The levitation station is just a block and  will have the magnets inside. This will make it look more mysterious and interesting. The dowel will have ring magnets on it then the opposing magnetic forces will make it hover in mid air.


Magnets are available at Lee Valley


The Base

The length is 6.5", width  3.75" and the height is 1.3".


The base is made using some oak, I did not have the right size block so I glued two pieces together and cleaned it up to get the size I needed.  A piece of spruce 2x4 from the local hardware store will work as well. It all depends on what kind of wood you like.


The magnets I will be using are one inch diameter so the base should be slightly thicker. You can also mark and drill the magnet holes and then trim the wood down later to the right size if this is easier for you.


After I found the right place for the magnets an awl is used to mark the centres. It is now ready  and  for drilling. This will help keep the drill bit from wandering.


A 1 inch Forstner bit is used to drill the holes. My stop on the drill press is used to make the holes the exact depth. The first set of holes are drilled 1/2" deep.

Note: Later I will drill the second set of holes 1.6" deep.

My vacuum hose holder is used to catch most of the sawdust.

 I found the best way to hold the block secure is to use a handscrew clamp. Even though this clamp is not secured to the table it does work good to keep the piece square while drilling.   


I tested and put some magnets in the holes but I could not take them out without messing up the hole and the magnet, so I drilled some small holes on the bottom. Using an awl or a small nail will help to pry the magnets.   

Being able to remove the magnets is a good idea. If you have to respace them or making sure the polarity of the magnets are correct, this will help keep things easy when building.


After some testing I decided to drill the magnet holes on one end a bit deeper. in the block, I think this will look better for the dowel. I also drilled  some more small holes for the magnet release. The first 2 small holes can be filled and sanded later.


I found a scrap dowel and put on some masking tape and the ring magnets. This way I was able to slide the magnets to see what worked. It did not take long to figure it out.


The dowel and ring magnets are placed against a block of wood and it was levitating. I can now carry on and make a nicer dowel, and make a slot for a plexiglass plate.


A dowel is placed in the drill and a point was made using the upright beltsander


The dowel is now cut to the right length, 6 3/4". Small pencil marks are made on the dowel where the magnets worked best. 


Plexiglass


Several saws are tested to match the thickness of the plexiglass. I have a small box with some pieces of scrap plastic and plexiglass. Plexiglass is available at a plastic shop.

 Before the wood can be cut I used an utility knife and scored the wood. This would give me a good mark for the handsaw. 

This should not be done free hand since the saw will wander and you won't get a clean line.


Plexi glass is cut on the band saw the width of the block, the height it 2 1/8".


A mallet was used to tap the plexiglass in the slot. It is friction fit and is very tight in the slot.   


.


Conclusion

Woodworking does not have to be hard, there are many projects that can be made with few tools.

I hope you find this one easy to make. Give it a try and let me know how it works out.

Making toys is fun and this levitator was pleasure to make, I will make a few and give them away as gifts.


See Also:

         Make a mini bevel gauge                 Magic knife holder                Magnetic scrap bin