
In the first part I built the main frame to hold the belt sander. It has a handle in the front for quick install and release of the sander. See here for the first part of the build.

Now I will show you how to build the second part of the belt sander. It will have two tables one for the side position and a tilting table for the upright position. The tables will be very easy to put on and take off.
The side table
To build the table for the side position the table top should fit perfect around the belt. This would work best and look best.
A piece of cardboard was roughly cut out to the shape of the sander belt. Then it was placed against the belt and sanded down giving it a perfect profile.

The outline was traced onto the table top.


After it was cut on the bandsaw it was put on the stand and it was a perfect fit.
That was too easy to do and the results were incredible.

Making Knobs
This project will used three turn knobs. The cost of knobs can add up they can cost around $3.00-5.00, so if you can make your own that would make sense.
Here I will show you step by step how to easily make your own knobs.
1. First, clamp a store bought knob on a piece of wood and trace the top and bottom of the knob. Hardwood or plywood works best. Below I used a piece of maple.

2. Cut out the knobs on a bandsaw or you can use a jigsaw.

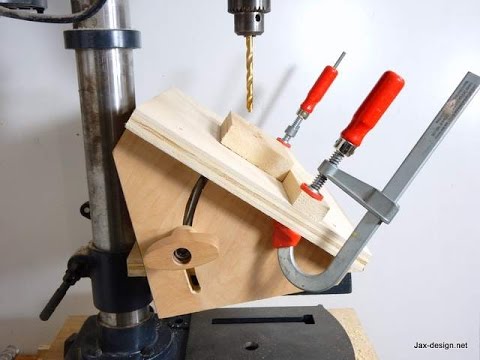
3. Drill out the center of the knob with the right size bit for the bolt you will be useing. This is a 1/4 " bit.

4. To make it look more like the store bought knobs the bottom should be cut out. Using a small hand saw this can be done in minutes.

The knobs are easy to make and when you are finished you can either lacquer or paint them. They will look just like store bought and you can make many for cheap.

T-nuts are added to the front plate. I just pounded them in and did not find it necessary to glue them or add a small screw for this application.

Slots for the upright table are cut with the bandsaw.
This system will make it easy to add or remove the table.


A small block is drilled onto the front board. This will hold the table and will also help for support and keep things lined up.

A drill guide block is used to drill a hole through both the sliding board and frame of the stand. A T-nut will be put in the back, this will be for the knob so the hole has to be precise.


The tilting table is just two pieces screwed together.

The wooden knob is added to the and can lock at any position up to 45 degrees. I tested it at different positions and it does lock very well. The table rests on the face board which helps keep it secure.

The table is taken apart and painted with lagoon and silver colour paint, which is the same colours as Makita tools.


Sanders are great for any workshop whether you are a hobbyist or a woodworker. I think they are a necessity. With the tables and different positions this small workhorse will get the job done.
With this handy sander you will find many uses and when you are finished it stores easy.
What type of sanders do you use? What is your favorite grit paper?
You may also like:
Large Clamp Small Hacksaw Angle drill Jig


Would you publish any drawings and/or demensions?
ReplyDeleteYes. I like this design more than others I have seen. Would like to purchase plands as well.
ReplyDeleteIs it Makita brand Belt Sander? I wanna check out.
ReplyDeleteThanks
Are you looking to purchase a Sander and have no idea which one you need? Or do you know which one you need but don't know what features to look for? benchtop belt sander reviews
ReplyDeleteJust the plans, I already have the sander.
ReplyDelete
ReplyDeleteHi Josh, Great you're thrilled with this 357. I've got one myself since like 10 decades. I enjoy it as well, not modded as yours however.
Currently it doesn't operate, it hastens when warm. Brought to a neigbour of mine and he will get a deeper look at it.
It seems like some have had trouble with the automatic decompression valve, does yours have this?
Have a fantastic day!Chainsaw Sharpening Angles
Yes, I am entirely agreed with this article, and I just want say that this article is very helpful and enlightening. I also have some precious piece of concerned info !!!!!!Thanks. Dogs collars and leashes factory Spain
ReplyDeleteI have to search sites with relevant information on given topic and provide them to teacher our opinion and the article. Båndtransportør
ReplyDeleteWe have sell some products of different custom boxes.it is very useful and very low price please visits this site thanks and please share this post with your friends. Training Corset
ReplyDeleteWow, excellent post. I'd like to draft like this too - taking time and real hard work to make a great article. This post has encouraged me to write some posts that I am going to write soon. belt sander
ReplyDeleteWith very rare exceptions, the main subject of your photograph must be sharp - not necessarily the whole picture, but certainly the subject. Even if you want the subject blurred, to give a sense of movement, then the background must be sharp. And you'll get the sharpest photographs by using a tripod. tripod for phone
ReplyDeleteWonderful website. Plenty of useful information here.
ReplyDeleteThis weblog presents valuable information to us, keep it up.
ReplyDeleteThanks for your marvelous posting! I truly enjoyed reading it
ReplyDeleteThe information provided is really very good and helpful for me
ReplyDeleteKeep sharing good information, you may be a great author.
ReplyDeleteI want to encourage you to definitely continue your great writing
ReplyDelete60250588
ReplyDeleteKaraman
Çorum
Kırklareli
Aydın
Afyon
Çankırı
Edirne
Kastamonu
Kars