
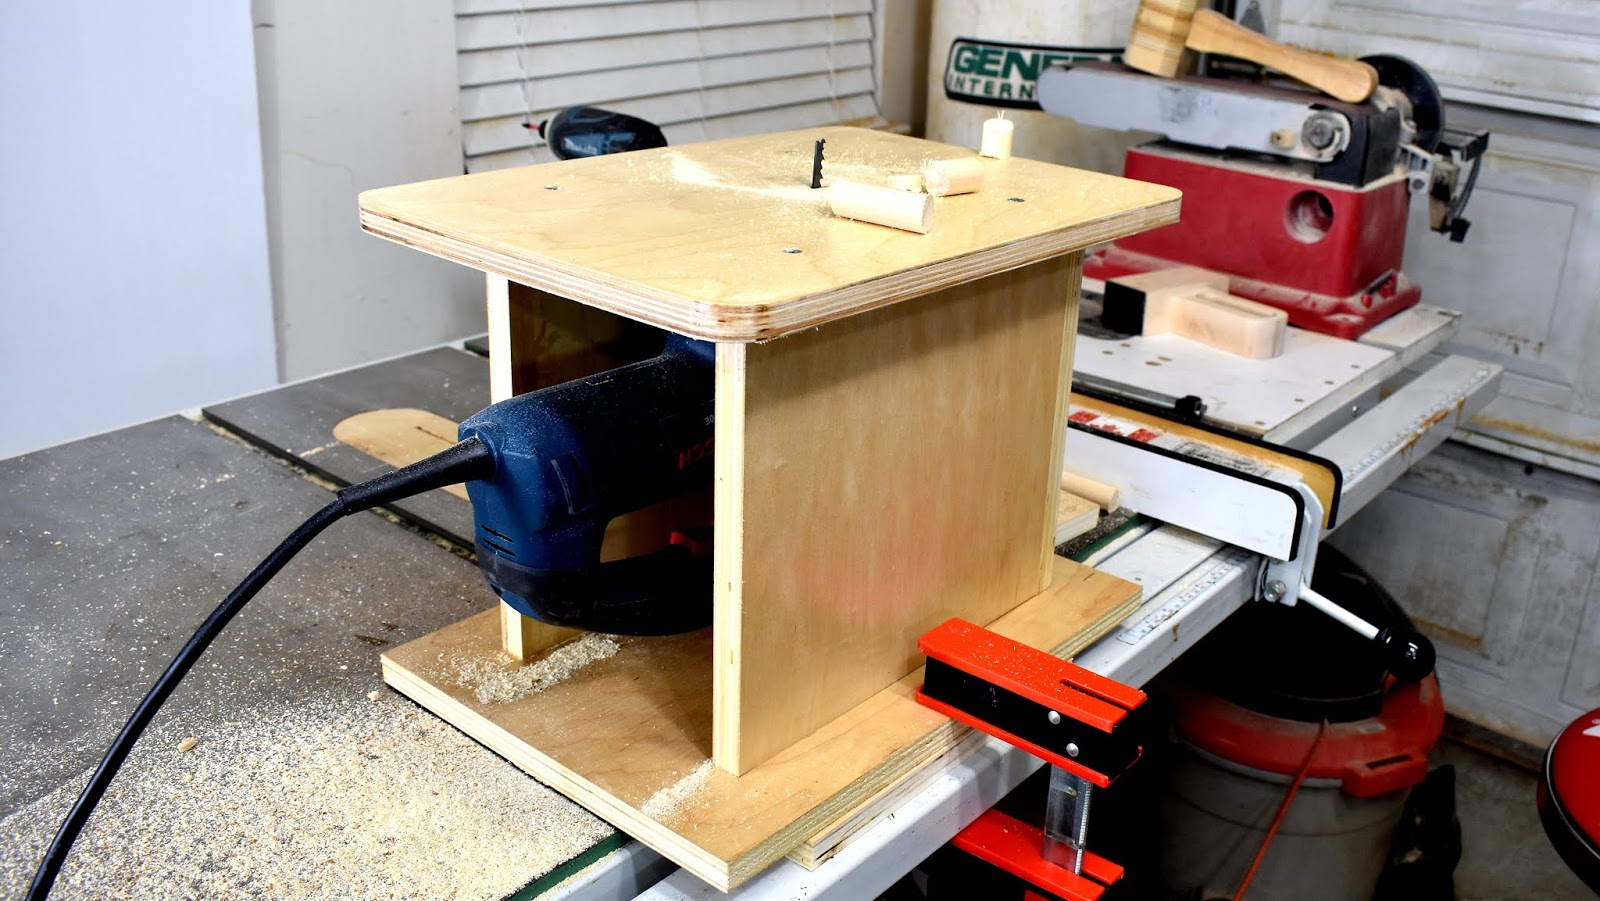
I made this simple jigsaw table for my shop. It is very basic and can be made using your cordless drill, jigsaw and a few other simple tools. You can go to your Home Depot and get them to cut the base top and sides to the right dimensions.

I made the base and top 11"x 15". The height is 11". The box is inset to the base 2" this is to help with clamping the unit on a workbench or other table.
You can make the first part of this table and clamp it to a table or workbench and use it right away. Or you can carry on and make the box.


The magnets are very strong and after a few tests I knew they would work fine.

Three sides are screwed together to make the support for the top. Remember to always use the right size drill bit for the screws or the wood will split.

With the jigsaw the corners can be rounded, this looks better and now there wont be any sharp edges. I did this only to the top since this is the work area.


 Large wood clamp Mini bevel gauge
I made the base and top 11"x 15". The height is 11". The box is inset to the base 2" this is to help with clamping the unit on a workbench or other table.
You can make the first part of this table and clamp it to a table or workbench and use it right away. Or you can carry on and make the box.

Here are a couple blocks, they will be for support/guides for the jigsaw. Four holes are drilled using a countersink bit.


Using a ruler carefully measure and mark the position for the blocks.
First screw on one of the blocks then put down the jigsaw and firmly place the other block on and screw it in. The jigsaw should now feel secure with no side play.

I can make the mark for the blade. To do that I found an old blade and cut it so it would fit even with the bottom of the jigsaw. This made the marking so simple.

The slot was drilled out using a 11/32nd drill bit.

Cupped 1" magnets are now installed. These are available from Lee Valley, they have a countersunk screw hole in the center of the magnet which makes them easy to install or remove.

These are very strong earth magnets so you must be careful, I made a video of a simple magnet separator which will come in handy.

A front block is drilled on, this will act as a stop guide when the jigsaw is put in the box and also helps with removal.

The magnets are very strong and after a few tests I knew they would work fine.


With the jigsaw the corners can be rounded, this looks better and now there wont be any sharp edges. I did this only to the top since this is the work area.

Screws are countersunk and put on the top. I then put on a few coats of Polyurethane. After it was ready I made many test cuts using different types of wood such as hardwood, softwood and dowels.
Everything turned out great, I was very pleased with the table. Caution should be taken when using the table. Since pieces are not clamped the upstroke of the blade can lift the workpiece so you always have to hold the pieces firm.

See Also:


This comment has been removed by the author.
ReplyDelete
ReplyDeleteYou need to kill time, you need entertainment. Refer to our website. hope you get the most comfort.
Thanks you for sharing!
visit our website
It was really insightful.
ReplyDeleteThanks for such a nice content.
Cheers
BTW if anyone interested more have a look sawfinder thanks
This is the type of information I’ve long been trying to find. Thank you for writing this information. SEO
ReplyDeleteThank you so much for such an informative piece of information :)
ReplyDeleteIf anyone interested similar one's have a look here
sawfinder
Thanks
This is a beautiful project.
ReplyDeleteI want this project
ReplyDeleteI will immediately snatch your rss feed as I can not to find your email subscription link or e-newsletter service. Do you’ve any? Kindly let me know so that I may just subscribe. Thanks. my review here
ReplyDeleteSakarya
ReplyDeleteKayseri
Van
Konya
Samsun
XTAWY
ordu evden eve nakliyat
ReplyDeletebursa evden eve nakliyat
konya evden eve nakliyat
osmaniye evden eve nakliyat
bitlis evden eve nakliyat
VYV
ordu evden eve nakliyat
ReplyDeletebursa evden eve nakliyat
konya evden eve nakliyat
osmaniye evden eve nakliyat
bitlis evden eve nakliyat
BO3
9618F
ReplyDeleteBartın Lojistik
Sincan Boya Ustası
Bone Coin Hangi Borsada
Samsun Parça Eşya Taşıma
Isparta Lojistik
Edirne Evden Eve Nakliyat
Samsun Evden Eve Nakliyat
Binance Güvenilir mi
Düzce Şehir İçi Nakliyat
9EF1A
ReplyDeletepeptides for sale
order deca durabolin
trenbolone enanthate for sale
testosterone propionat
order dianabol methandienone
testosterone enanthate
buy steroid cycles
buy testosterone propionat
buy sustanon
5C254
ReplyDeleteAlya Coin Hangi Borsada
Silivri Çatı Ustası
Keçiören Fayans Ustası
Çorlu Lojistik
Ünye Marangoz
Iğdır Şehir İçi Nakliyat
Düzce Şehir İçi Nakliyat
Adana Evden Eve Nakliyat
Probit Güvenilir mi
8EB69
ReplyDeletegümüşhane telefonda rastgele sohbet
nanytoo sohbet
bartın bedava sohbet uygulamaları
izmir canlı görüntülü sohbet uygulamaları
Antep Ücretsiz Sohbet Uygulamaları
erzurum görüntülü sohbet
amasya görüntülü sohbet
sivas sesli mobil sohbet
adana sohbet muhabbet
FE3C3
ReplyDeleteDiscord Sunucu Üyesi Hilesi
MEME Coin Hangi Borsada
Facebook Grup Üyesi Satın Al
Likee App Takipçi Hilesi
Facebook Beğeni Satın Al
Twitch İzlenme Hilesi
Omlira Coin Hangi Borsada
Big Wolf Coin Hangi Borsada
Soundcloud Dinlenme Satın Al
F7A2A720E6
ReplyDeleteücretli show
ücretli şov
whatsapp ücretli show
telegram görüntülü şov
görüntülü şov whatsapp numarası
cam show
skype show
cam şov
whatsapp görüntülü show güvenilir
574A56E685
ReplyDeletelifta
performans arttırıcı
yapay kızlık zarı
stag
bayan azdırıcı damla
degra
bufalo çikolata
fx15
green temptation
578823FEE2
ReplyDeleteucuz takipçi
8EC4C384A3
ReplyDeleteTelegram Mining Botları
Madencilik Botları
Telegram Para Kazanma Grupları
Yeni Telegram Coin Botları
Yeni Telegram Airdrop Botları
4AB9CEADE4
ReplyDeleteTelegram Güvenilir Airdrop Botları
Telegram Güvenilir Coin Kasma Botları
Yeni Telegram Oyun Botları
En İyi Telegram Kripto Oyunları
En İyi Telegram Coin Kazma Botları
C558E3894B
ReplyDeleteen ucuz tiktok takipçi
twitter beğeni satın al
organik takipçi
aktif takipçi
twitter takipçi
Really cool build! I’ve been organizing my small workspace and was looking for a compact jigsaw table idea like this—something simple yet functional. Your design with the inset base and magnetic release is super clever. Funny enough, when I’m not in the workshop, I’ve been messing around with customizing games—I play https://thesummertimesagaapk.com/. It’s a different kind of creativity, but both involve problem-solving and fine-tuning setups to get things just right. Appreciate you sharing this detailed walkthrough!
ReplyDelete48999500FC
ReplyDeletemmorpg oyunlar pc
sms onay
vodafone mobil ödeme bozdurma
tiktok takipci satın alma
-
6F6FCF11D0
ReplyDeletekiralık hacker
kiralık hacker arıyorum
kiralık hacker
hacker arıyorum
kiralık hacker
ReplyDeleteISO 42001 führt klare Vorgaben für das AI-Management ein und fordert Unternehmen auf, Risiken durch Künstliche Intelligenz systematisch zu steuern. Dabei sind konkrete Governance-Strukturen notwendig, um den Einsatz von KI transparent zu gestalten und unvorhergesehene Folgen zu minimieren. Die Norm verlangt die Einrichtung eines Risiko-Managements, das speziell auf KI-Anwendungen abgestimmt ist und kontinuierlich überprüft wird. Im Jahr 2023 hat die Bundesanstalt für Arbeitsschutz die Bedeutung dieser Maßnahmen in der Cybersecurity weiter betont. Für eine erfolgreiche Implementierung müssen Firmen ihre bestehenden Sicherheitskonzepte anpassen und neue Kontrollprozesse integrieren. Eine zentrale Rolle spielen dabei auch technische Standards wie AES-256 zur Verschlüsselung sensibler Daten sowie die Einhaltung des § 202c StGB bezüglich Datenschutzverletzungen. Das Bewusstsein für diese Anforderungen wächst stetig, da bei der Nutzung von KI-Systemen immer wieder Schwachstellen entdeckt werden. Mehrere europäische Gesetzesinitiativen fordern seit 2022 eine stärkere Regulierung des KI-Einsatzes im Bereich der kritischen Infrastruktur. Um den Herausforderungen gerecht zu werden, setzen immer mehr Organisationen auf spezialisierte Weiterbildungsangebote im Bereich cybersecurity weiterbildung; Informationen dazu finden Interessenten regelmäßig bei Anbietern wie https://csvisor.de/.