
.jpg)
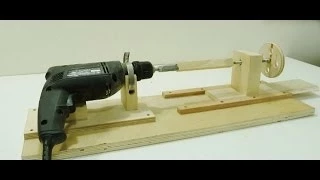
could drill horizontally and drill angles. It has a handle, stop block and depth gauge. The drill works well for small pieces and can drill precise angles.
.jpg) |
| I cut another slide to fit the slot used for the mini lathe. It was then carefully cut on the table saw at 30°. |

.jpg)
To make the miter I used a piece of 3/4 inch Baltic Birch and drew a half circle. I do own routers, but sometimes I find I can set up my drill press easier and quicker than setting setter up my router.

.jpg)
.jpg) A small handle was made with the band saw and belt sander, I gave it a coat of lacquer since it will get a lot of use and it will stay clean and feel better.
A small handle was made with the band saw and belt sander, I gave it a coat of lacquer since it will get a lot of use and it will stay clean and feel better. A stop block and a depth gauge was easily added for controlled drilling.
.jpg) I tested my first piece and randomly drilled at different angles. I placed pencils in a block to give an example how it works. This method works quite well and the angles can easily be adjusted very quickly.
I tested my first piece and randomly drilled at different angles. I placed pencils in a block to give an example how it works. This method works quite well and the angles can easily be adjusted very quickly.

Here I used a Forstner bit and drilled a scrap and made my first pocket hole. It turned out not too bad and I will be using this more often.
How to make a mini lathe How to make a wooden clamp

You might also like:
How to make a mini lathe How to make a wooden clamp
Informative and interesting which we share with you so i think so it is very useful and knowledgeable. I would like to thank you for the efforts. I am tiring the same best work from me in the future as well.
ReplyDeleteSorry I missed your comment till now. I am glad you liked it, and thanks for sharing.
DeleteThanks for sharing your experiences. I'm doing some research on woodworking. I want to improve my woodworking skill to do some interesting things like you. So your post is quite helpful.
ReplyDeleteScott, I am glad you found this helpful, let me know how things go.
DeleteInteresting blog. I am so glad i found it, there are so many tips, photos. I'll send the link to my brother because he wants to change his kitchen furniture and to do it himself. Thanks
ReplyDeleteThanks for checking it out, I hope the information helps.
DeleteI am also a DIY. Especially, i enjoy your product. Perhaps, this article is one of your post that you like most. These wood tools are both nice and beneficial.
ReplyDeleteSo smart, you gave it a coat of lacquer since it will get a lot of use and it will stay clean and feel better. Thank for sharing your experiences.
ReplyDeleteAnd lacquer also makes it look better.
DeleteI must agree with your tips. It is quite similar to the basic sanding guides I follow personally when I am working with wood.
ReplyDeleteThey are generally not intended for drilling into wood or other similar materials. Rotary hammer drills use a special bit designed not to slip in the chuck. The most common types are the SDS and spline drive. awesome blog
ReplyDeleteGreat drill presses have tables that can be raised, brought down, and swiveled 360 degrees around the section of the drill press. great post to read
ReplyDeleteFrom drilling fine gaps in models to spinning copper wire for set of hoops, there are drills for you. You should need to investigate littler, versatile drills to oblige your outlines. Utilizing littler cordless drills will likewise enable you to get in at edges without being impeded by links.Best ryobi cordless drills
ReplyDeletei was just browsing along and came upon your blog. just wanted to say good blog and this article really helped me. https://royalcbd.com/product/cbd-oil-1000mg/
ReplyDeleteAA34BC67F2
ReplyDeleteBeğeni Satın Al
Telafili Takipçi
Instagram Takipçi Kazan