

A hovercraft table for the workbench will come in handy to move heavy machines around. I think it would be ideal if one had a very large work bench and can have a few floating around. These tables can be made very quickly and are very inexpensive.

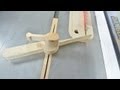
To start I will make the base, two pieces of plywood will be used for this. I used my large wooden caliper to mark the center on a piece of 3/8" plywood. This will be drilled to fit the air hose.

Since the board will not fit in the drill press I used my small drill
guide block to drill the hole. The block has a v-shape in it and will
keep the drill bit straight.

For the bottom I used a high density overlay wood panel, these
are used for concrete forming, sign making and industrial applications.
To drill this hole I used a 1 1/8" forstner bit, this hole will be for the
air to escape.

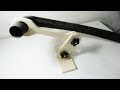
A 1/4" check valve is screwed into the 3/8' board, I was also able to put a nut on the other end. I did not tap the wood but made sure I used the right size drill bit to give me a very secure fit. It was such a good fit I was able to lift the whole piece with just the hose.

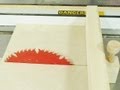
The next day all I had to do is round the corners with a jigsaw.
Just about done.....

After I tried it for awhile I thought I would add some tape to the
bottom, this will create more of a cushion of air for the hovercraft
to glide. It is commercial foam tape with a closed cell, after I
applied a strip around the perimeter I tried it agian and it turned out
great. I tried it on the floor but it did not work very well on cement
so I think I will build a larger one using a leaf blower.

This is the first one I built but I did not like the way it moved around the bench so I tweaked it a bit .......

I added a small platform on top, this would help distribute the weight more evenly. After I put the drill press on it took off all over my bench!
See also;
Cutting perfect grooves Dust collector arm Table saw safety stop

Make a circle cutting jig Table saw finger board Male a tool caddy


9D513D1FA0
ReplyDeletekiralık hacker
hacker arıyorum
kiralık hacker
hacker arıyorum
belek