
Hammers are a very important tool for any woodworker. You can get by by using a regular claw hammer and a block of wood but for convenience a wooden mallet would be handier.

A basic wooden mallet is probably one of the easiest things to build and does not take a lot of experience or material. You can build a simple one or a more fancier one. Here I will show you step by step how I built this wooden dead blow mallet.
To start I will use a 3 1/2" hole saw and cut some hardwood and plywood disks. They will be glued together to make a cylinder.
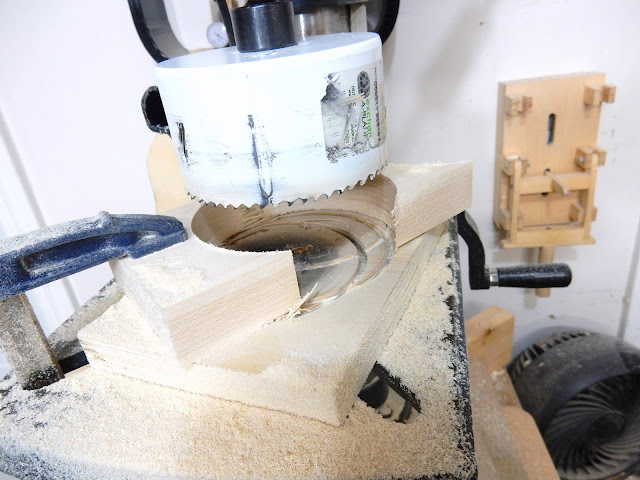


I saved the center of one of the rings and used it to mark the top of the cylinder. This will be a guide so I know where not to cut. I will cut in 4 sides of the hammerhead to give it a nicer shape.

A quick jig was made with some cheap plywood. Also see the small wedge, this will help keep the cylinder from rotating.


After the first cut a square was used to cut the opposite side. I continued until I had four sides. This gave the hammer head a whole new shape.


To make sure everything would be kept square I used a miter gauge, first to cut the length which is 1 ft, and then to cut some marks for the dado cut.


A bandsaw was used to cut some slots, these will be for the wedges. Also the sides were cut to give it some shape.


Off to the router to round the edges.


A basic wooden mallet is probably one of the easiest things to build and does not take a lot of experience or material. You can build a simple one or a more fancier one. Here I will show you step by step how I built this wooden dead blow mallet.
To start I will use a 3 1/2" hole saw and cut some hardwood and plywood disks. They will be glued together to make a cylinder.

With a hand screw clamp the disk shown below is clamped to the drill press table and a smaller size hole saw is used. This will make a ring and will be for the lead weights that will be added later. This has to be done for two of the disks.

Here are all the pieces and the clamping system to make the hammer head.

I placed the threaded rod in my wooden clamp and started stacking and glueing the disks together.
15x 14 gram weights are placed in each of the 2 rings, this will add just about 1 pound to the hammer.

The pieces are numbered to make sure they stayed in order while glueing.

After three disks and the weights are put together I will wait for the glue to dry so I set it aside. This was just a precaution, I wanted to make sure everything lined up properly before I carried on.

Now the rest of the disks are glued and clamped together. They are set aside until the next day.

Since I used a threaded rod for clamping I was able to mount it to the drill press and clean it up with some sandpaper. The base is a block of wood with a small metal cup that fit the threaded rod.


I saved the center of one of the rings and used it to mark the top of the cylinder. This will be a guide so I know where not to cut. I will cut in 4 sides of the hammerhead to give it a nicer shape.

A quick jig was made with some cheap plywood. Also see the small wedge, this will help keep the cylinder from rotating.


For the hammer handle I will be using a piece of old pallet. I don't know what kind of wood it is but it is a hardwood and when it was cleaned up it turned out very nice.

To make sure everything would be kept square I used a miter gauge, first to cut the length which is 1 ft, and then to cut some marks for the dado cut.


A bandsaw was used to cut some slots, these will be for the wedges. Also the sides were cut to give it some shape.


The head is glued on and some hardwood wedges are cut and hammered into the handle.
Since the ends had the threaded rod it left a small hole. This was easily filled in with a small piece of dowel and glue. The ends were later trimmed and sanded smooth.

Varathane is used for the finish

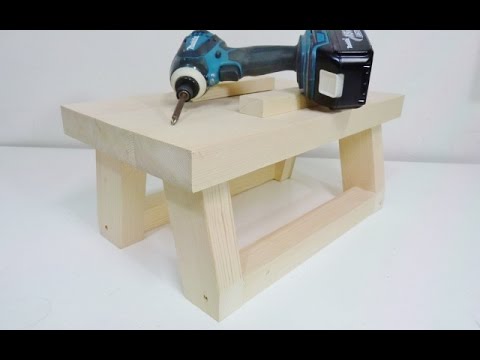
For a test I thought I would try hammering square pegs in round holes. I used hardwood oak and a piece of fir. A couple of good whacks with the new hammer and they went in.

The hardwood enlarged the holes and forced them to a square. I cleaned them up with some sanding and was very pleased with the result.

Conclusion
Hammers are a must for any workshop and a wooden mallet will come in handy more than you think. They are easy to make and you can come up with your own design.
Dead blow mallets are very interesting. With the added weight they give a harder hit and there is little to no bounce upon impact. Plus they have a good feel to them.
I put varathane on for the finish except for one of the faces. Being a hammer I thought it would ruin the finish pretty quick. I will find out soon enough but let me know what you think?
See also:
That's a very nice mallet. Another nice touch would be to put those square pegs into the round holes on each end of the mallet where you had the all thread you used for aligning all the disks for glue up.
ReplyDeleteThat's a good idea, thanks Frank.
ReplyDeleteIt really is a great mallet. A further awesome touching could be to decide to put all those rectangle pegs on the game loopholes for each one ending of your mallet when you felt the need a all of bond you actually used in aiming many of the hard disk drives to get glue right up.
ReplyDeleteWonderful illustrated information. I thank you about that. No doubt it will be very useful for my future projects. Would like to see some other posts on the same subject! wooden pallets
ReplyDeleteThere are various factors that you have to consider before purchasing a wooden garage. click this site
ReplyDeleteThe information you have posted is very useful. The sites you have referred was good. Thanks for sharing.. http://goh-pbl.com
ReplyDeleteThanks for your post. I’ve been thinking about writing a very comparable post over the last couple of weeks. I’ll probably keep it short and sweet and link to this instead if thats cool. Thanks. Best Dust Collector
ReplyDeleteJust admiring your work and wondering how you managed this blog so well. It’s so remarkable that I can't afford to not go through this valuable information whenever I surf the internet! CutTheWood (Woodworking Projects)
ReplyDeleteThrough and through there are four rewards that accompanied this arrangement of woodworking plans. The principle and most vital reward that accompanies this bundle is the DWG programming for plan seeing.CutTheWood.com
ReplyDeleteIn the circumstance of selecting which harsh woodworker to utilize for a task, you need to use the very same concepts as you would certainly when employing any kind of tradesperson with experience being a primary element. A potential client needs to ask for instances of any type of coming before work.SubZero, Viking Freezer Repair in REDLANDS
ReplyDeleteThese plans are also great for intermediate and advanced woodworking users as well. If you decide to purchase this product then you will be able to use the product for 60 days under their money back guarantee. In addition, you can contact customer support if you have any questions in regards to the product.get more info
ReplyDeleteBeech wood is typically finished (takes finish well), regularly used to copy different woods like mahogany, maple, or cherry. CNC router machine
ReplyDeleteJax Design showcases innovative creativity, much like the montana coat rdr2 embodies rugged style and functionality. Both emphasize the importance of design in expressing identity whether through unique creations or iconic fashion. Just as the Montana coat offers warmth and character in the game, Jax-Design inspires us to embrace our personal aesthetics.
ReplyDeleteThis comment has been removed by the author.
ReplyDeleteThis comment has been removed by the author.
ReplyDelete
ReplyDeleteCreating a deadblow wooden mallet is a great DIY project for anyone looking to make a durable, non-marring tool. A deadblow mallet reduces rebound and is ideal for delicate tasks where metal tools might cause damage. It's made from wood, often with a hollow core filled with material like sand or steel shot to provide weight and control.
For a step-by-step guide, check out this OXVA NeXLIM Pod Vape Kit
Cool
ReplyDeleteD072952AFA
ReplyDeletekiralık hacker
hacker arıyorum
belek
kadriye
serik
2A030A171E
ReplyDeletekiralık hacker
hacker bul
tütün dünyası
-
-
49E9A96433
ReplyDeleteTakipçi Satın Al
M3u Listesi
Erasmus
MLBB Hediye Kodu
Rise Of Kingdoms Hediye Kodu
AF3E7BB5CA
ReplyDeleteTakipçi Satın Al
M3u Listesi
Erasmus
Kazandırio Kodları
Call of Dragons Hediye Kodu
9A8F349B80
ReplyDeleteGüvenilir Show
Telegram Görüntülü Şov
Görüntülü Şov
419710A7FB
ReplyDeleteGörüntülü Sex
Ücretli Show
Telegram Show Kanalı
The Candyman Coat is not just outerwear it’s an attitude. With its striking design and commanding presence, it turns ordinary days into cinematic moments. Dare to wear it, and watch heads turn.
ReplyDelete
ReplyDeleteEine Cyberversicherung setzt klare Voraussetzungen voraus. Sie verlangt meist einen Sicherheitscheck nach den Vorgaben des BSI-Standards TR-03111 und einen Nachweis über eine funktionierende Firewall. Viele Anbieter schließen bekannte Schwachstellen aus, etwa unverschlüsselte Datenübertragungen oder veraltete Systeme. Das Einhalten dieser Kriterien schützt nicht nur vor Schäden, sondern ist oft eine Bedingung für den Abschluss einer Police. Für Unternehmen in Norddeutschland empfiehlt es sich, bei der Cyberversicherung auf die spezifischen Anforderungen zu achten, damit im Ernstfall keine Überraschungen auftreten. csvisor.de zeigt, wie wichtig eine solide cybersecurity weiterbildung für diese Voraussetzungen ist. Typische Ausschlüsse sind oft Attacken durch Insider oder ältere Schadsoftware, die bereits bekannt sind und nicht mehr als Schutzlücke gelten.