Showing posts with label Clamp. Show all posts

Sunday, May 14, 2017

How to make hex drivers

Hex screws or bolts are found in many machines and tools, and if you make jigs they can come in handy. Whether it be set-screws or bolts they are great for securing objects together.

Hex drivers work good for initial loosening and tighten but what I don't like about the common hex drivers is when you have a large bolt with lots of thread it does not turn fast. A t-handle is better or you can cut an Allen key and fit it in a drill, and this will go really fast. 

The wrenches with handles are not readily available at my local hardware store so instead of buying online I decided to make my own. I have collected many wrenches over the years so I decided  to make some handles. 


I will be making the sizes that I use the most around my shop. I will stick with Imperial for now, if I have to make more that will be easy enough.  Sometimes Imperial works on a metric fastener. For example 4 mm keys are the same size as 5/32",  8 mm will work on 5/16" and 19 mm are close to 3/4".   This is good for use on consumer products because the end user can use imperial or metric on fasteners or keys and vice versa without stripping.   


Let's start building

A piece of oak will be used for the handles, I like the look of oak and being a hardwood it will do well in the shop and last a long time.


                               To make a clean precise cut I used my  feather board, this keeps the 
                               board tight against the fence and ensures a better cut.


 After a strip was cut I turned the blade to 45 degrees and ran it through the saw 4 more times. This will make an octagonal dowel. I think this will give the handle  a nice look.


With a sled and a stop block set at 4 inches I cut the dowel into smaller pieces. To figure out a good length  I measured a couple of different screwdriver handles in my shop and they were all 4-5 inches. 


To find the centre of the octagonal dowel I cut a small block a tiny bit smaller than half the width of the dowel and made a mark. As the dowel is turned it can be marked anywhere and the intersecting lines will give you the centre.


A simple jig was clamped to the drill press. This was made with a 2x4, it had a v-groove cut in the middle and the ends were cut out for the clamps. After the  jig is lined up to match the brad point bit to the dowel  it can be clamped.  Now the  dowel will sit in the v-groove notch and just by holding by hand the dowel centers can be drilled very fast.


                                Everything lines up. 


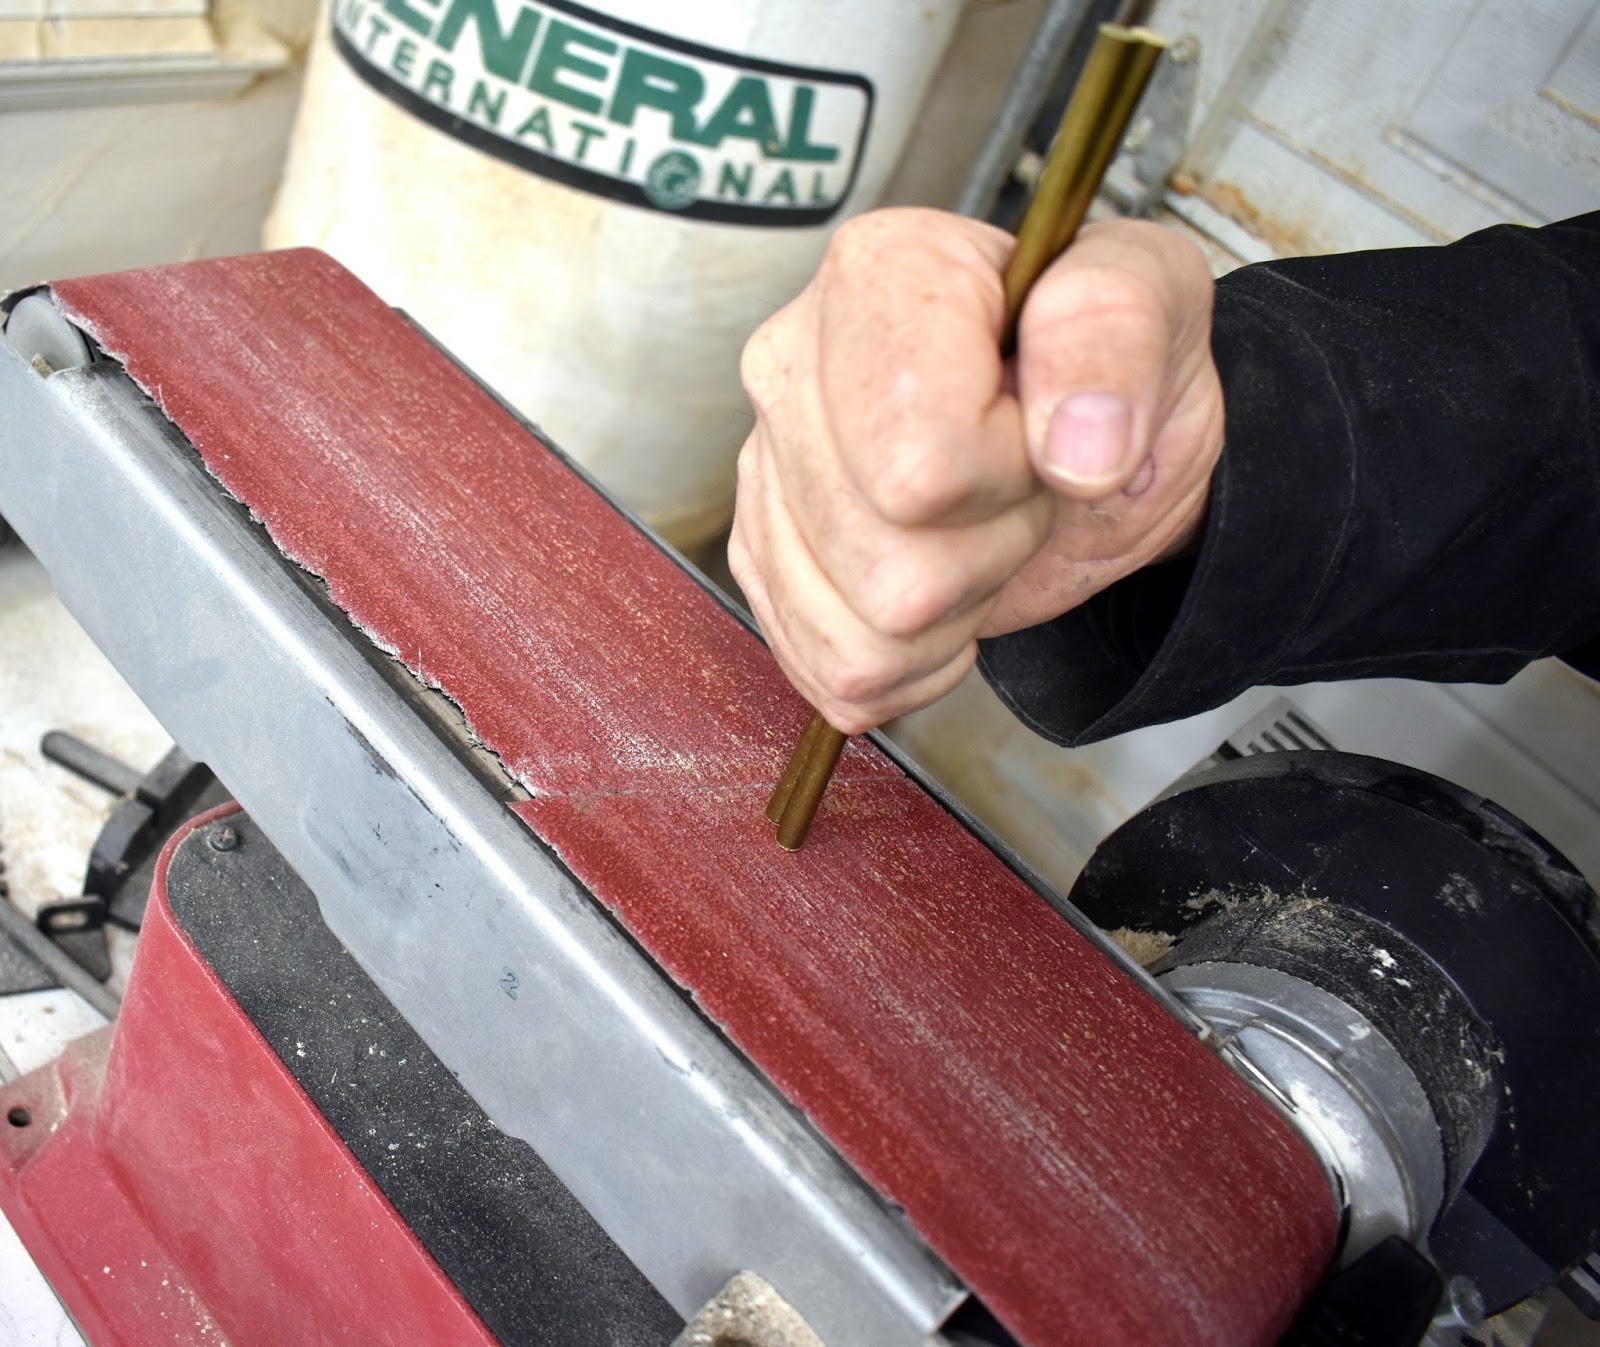
After the holes were drilled the ends can be tapered. I will do this using my new belt sander. To do this another simple jig was made. This one has a block that swivels and a screw as a stop. The taper angles can be changed depending on how you set the stops. 


 The Allen keys can be cut either with a hacksaw or an angle grinder. I recently built this angle grinder holder and I find I am getting a lot of use out of it. 


 Epoxy is used to glue the wrenches in the handles. After plenty of glue was applied the wrench was placed in a wooden vise  and tapped in the hole.  Any glue squeeze out was cleaned up right away.


After the glue was dried the driver was put in a drill and the other end was sanded a small amount giving it a nice round edge.


Conclusion

If you work with a lot of hex screws these hex drivers with come in handy. They work great for long screws since they are more comfortable to handle and will turn faster. You will still need a second set for the initial loosening and tightening.


Making the handles octagonal and using the simple jigs for shaping helps create a nice looking tool.

I have always enjoyed making jigs and tools, what kind of tools have you made?

You may also like these:


   Pocket gauge                                                Dead blow mallet                                  Wood caliper   


Wednesday, April 5, 2017

Magic Trick Puzzle Box

A wooden puzzle box or mystery box is a lot of fun to play with. And if you are a woodworker this is a very easy build. 

 Great for hiding gifts or treasures and it will keep people guessing. Just watching kids and adults try to open the box is entertaining. Everyone seems to just about get it but will give up!

 The box is made with hardwood maple, some brass rods, screws and glue.

 I like the look of maple and it is durable. It can also be made with other woods such as plywood or finished wood off the shelf at your local building center.

 You don't need a lot of tools to build this box. Having many tools is nice but you can make this box with just a handsaw or jigsaw and some clamps. If you are a beginner woodworker or advanced this is an easy project. If you can build a box you can make this.


 Here the box sides are being cut. I will use my miter gauge  to cut the pieces the exact length. It is very important and this will ensure a perfect square box.


Since rough maple was used the pieces  were ripped with the table saw and cut to 17 mm. for 2 sides. The two ends were cut to 24 mm. thick.  The height of the pieces is 70mm. 


The sides are now ready and I wanted an easy way to join them so I will make dado cuts on the end pieces and glue them. This is very easy and does look good.


The ends now have a dado cut on them, this was done using a Sled and a single blade. The sled has a stop on it so you can chip away until you get the exact cut which is the thickness of the side piece. This way is very accurate and saves the time it take to change the blade or if you don't have a dado blade. 


The ends are marked and three cuts are made on each as shown above. The cuts are longer than we need but can be filled with some wood strips later.

 The same technique was use to make the dado cuts. First measure, mark and then set the fence and chip away until they are 1/4" wide. 


 The pieces are first dry fit making sure the box was square. It is always a good idea to check with a square. It should not be glued at this time. It is best to make the lid and then test all the pieces together for a nice fit. 


Making the lid


The lid top is 107 mm. x 213 mm. 
The lid is built up, the first layer is solid maple (10mm.) then a piece of plywood (10mm) is glued to it. This piece was traced from the inside of the box then cut out.


Several strips of maple are cut, they will be the guides for the brass rods.


Now is a good time to make the brass rods. Any metal rod can be used, these were just what I had on hand.

The 7 mm brass rods are cut first using a pair of bolt cutters. They are cut slightly larger, and then they can be ground down to 178 mm in length . 


Using a belt sander works nicely and you can get very good results.


The guides are glued and they are spaced 13mm apart. The brass rods are tested for fit. Everything looks good and now the last piece can be glued on. 


Glueing the box together


                       The sides are now glued together and clamped. Again the box is                        checked for squareness. If it is not square apply more or less                            pressure to the clamps until you get it right.


The dado cuts are filled with some dark oak strips. This will add some contrast to the inside of the box.


Small wood screws are added to the middle end of each slot. Depending on how they are set this will make the difference on how the rod moves over the screw tip.

If they are turned clockwise it will be more difficult and counterclockwise will be easier. A small amount of turn will make a large difference. 


The top fits nice and it is ready to test. I just added a few coats of spray lacquer and it looks great.


Conclusion

Boxes are easy to make and if you can make a puzzle box it will be more fun. I so far asked 24  people to open it and only one could, and that was just lucky because the rods were in place. 


I fixed that......


Adjusting the screws a very small amount it will make the lid more difficult to open since the rods have to move over the screw ends. To open it will need a harder spin to move the rods.


 Without knowing the trick it is a very difficult puzzle. What wooden puzzles have you built? 


         Make a Multi Bit Screwdriver        Tool Caddy                        Dowel Stop Gauge


Sunday, November 13, 2016

Wooden Machine Vise

How to make a wooden vise? Clamps and vises are great for any shop and if you can make your own that is even better. Having many tools in your shop is a good thing. You never know when you need that extra vise and you can work on more than one project at a time.

I will show you how to make this wooden vise, actually it looks and works like a machine vise so I will call it a wooden machine vise.  


There is no shortage of different types of vises or how to make them online. I made this wooden vise   and it has over 900,000 views. I get many comments from people who say they want to build it.


This vise was one of the first ones that I made and I still use it regularly. It works great for clamping and gluing larger pieces.


Base


To start with I will be using a piece of engineered flooring, it is multi cross layered plywood and 1/8" oak layer on top. This piece is cut 7 1/2" x 6"  and will make a solid base for the vise.


Monday, October 3, 2016

7 Wood Joints You Can Make With Your Bandsaw

Joining pieces of wood together is a part of woodworking. Different joints and techniques are used to meet different requirements of what is being built. Wood type, strength, and appearance should all be considered for the purpose of the joint.


I will show you 7 different joints and with some practice these are all quite easy to make and require very few tools. A few tools are used for marking and measuring and a bandsaw for cutting. Fir and cedar are used for a nice contrast. I will show you a few instructions for some of the joints and the rest use the same technique.


Tools

There are many fancy tools and machines on the market but I wanted to make nice joints with few and simple tools. They can  be made using a handsaw but I like to cut fast so I will use a bandsaw for all the joints. 


I also made a jig to cut some angles but there are other ways to do this, such as tilting the bandsaw table. Here are a few tools that you will need.


           caliper       clamp       pencil        bevel    small square       bandsaw   

           glue     sandpaper   


How to make

To make these joints here are some important tips. Always keep a sharp pencil, carefully make your marks and cut slow and precise. Make sure you cut on the correct side of the line. Softwoods are easiest to work with. 

Bonus Tip
When the pieces are glued and clamped the wood compresses a bit. When the glue is dry you can sand the joints and they will look flawless. 
                                                                               
I will show you the steps I used for a couple of the joints. 


Dovetail Joint

This joint looks great and is a signature of craftsmanship. It is very popular in furniture making. To start  a bevel gauge  is used to mark some angles on the cedar. The angle degree or length was not important, just what looked nice. 


A piece of fir is positioned and clamped to the cedar. Now with a sharp pencil you can mark the tail that has to be cut. 


The tail is cut with the bandsaw in four cuts and ready to test.


Using a wooden mallet, the pieces are tapped together. It was a perfect fit, I took it apart and put on some glue.


Cross halving joint

Of all the joints I have made here this is the easiest one to make. Again make some marks on one piece similar to the photo. After you cut the block the second one can be placed square on top and mark that piece.


Cutting the blocks. It doesn't matter which one you cut first since both blocks should be identical.


                      Bingo, a perfect fit!


Half lap dovetail joint

This is a good looking joint and a bit more difficult to make. You can always tilt you table but I wanted to try make a jig that swivels quick so I had to modify my small bandsaw sled. I added some pins to the ends of the base to act as a stop for a swivel table. It worked out but this jig can always be refined. It may be a future project.


A sliding fulcrum and the table top are added and now I can cut any angle. The cedar is cut first then the fir was clamped and traced out the same way as the dovetail joint. This was the only joint I had to use a chisel and clean out the cedar a bit.


For the rest of the joints the same techniques are used. They all turned out clean and tight fitting. 


                              Bridle joint


                               Framework dovetail


                             I did not know the name for this so I called it an arrow                                     joint.


                                         Angle bridle joint


Conclusion

When it comes to making wood joints always start with easy ones and work your way up to the more difficult ones. Start with softwoods and experiment with different colours.

 Softwoods such as cedar and fir look great together. With  some practice you can make your own beautiful  joints. 

Do you have any experience making joints? What kind have you made? Share your feedback in the comment section. 


See also:

              Mini speed square                           Impossible dovetail


                Make a mini hacksaw                                                           Angle drilling jig