.jpg)
Here are the two squares I use the most in my shop, a speed square and a mini machinist square. I thought I would combine the two and that's how I came up with the idea for a mini speed square.
To make the square I cut a piece of maple to a thickness of 1/4 inch.
This can be used for the triangle and the lip.
I made a few of these so I used different types of wood. To cut the triangle I used my table saw sled and my speed square. I just held the piece firmly and cut a few triangles.
For the lip for the square I cut small strips 2 1/2" in length. I then glued them to the triangle.
Although it was not necessary I wanted to add a triangle in the middle, this can be used for sliding the square along a piece of wood and produce a straight line parallel to the edge. The inner triangle is 1/4 inch and 1/2 inch from the edge.
I drilled three holes and then carefully chiseled out a triangle in the middle of the piece.
Here I am testing the square for accuracy.
The square can be used as a guide for a jigsaw, the saw will cut accurately 90 deg and 45 deg as I show in the video.
See Also:
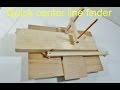
make a work bench from one 2x4 fastest center line finder
.jpg)
.jpg)
.jpg)
.jpg)
.jpg)
.jpg)
.jpg)


Jack, you are the man! I just saw your mini wood lathe on youtube, and its exactly what I need with the limited space I have. With so many different pieces of machinery, a storage full, transferring equiptment from storage, using every square inch of space to tight storage solutions the mini lathe is a awesome idea. It also appears to be lightweight which will be a little easier to fit in car/trunk/carry etc. My only concern is the drill. I would assume you gotta turn it off for a minute every 45 seconds or so. Which happens to be just fine as you plan your next move/measure/smoke a cig etc.....Thanks a lot, it would be nice if you included a written one on the site for a little better reference, but I think I can figure it out. I also assume you have the drill hooked up to a foot pedal either on/off, or momentary.
ReplyDeleteI also love the tool/bit caddy design. Theres a million ways to do it from carosels, drawers, bins, totes, cases, hooks, wall hanging with pockets, rolling carts, etc....but the one you made is most likely the handiestI currently use my wall with 4x4, but for the ones I havent constructed, they will recieve a modified/differently sized version of yours just including some kind of mount to my walls to take from use at a bench to a secure spot outta the way., which allow me to use hard to reach spaces. And a spot for one caddy on the end of the lathe, etc....
The self centering jig is another winner, keep up the good work, and thanks for the low cost, micro solutions.
Also, for my mini lathe offspring, I think a good idea is a 5 sided hinged rectangular box (without bottom) attached to the back (furthermost part away from the user), that could also serve as a vaccum hood. So basically it would flip over the mini lathe, enclose it, then have some sort of diy locking mechanism with handle at top to carry it, store away dust free, etc... Then have something that holds the box frame up off the back of the table, have stratigically placed holes/shopvac fittings at the most used area to make a partial dust hood. Now, two heads can be better than one, and I hope I can get myself to do this. I could also figure out from this hood position how to make frame that hooks onto the hood/case with a acrylic safety guard over the unit. Because I like my teeth, and how they work for me allowing me to eat wonderful food everyday! Thanks much.
DeleteYep, Once again. After making the trunk style casing, you gotta add cup hooks on side or top of the box to wrap the cord up in, in the most space saving arrangment.
DeleteB3BB6D5F44
ReplyDeleteTakipçi Satın Al
Whiteout Survival Hediye Kodu
Erasmus
3D Car Parking Para Kodu
Dude Theft Wars Para Kodu