

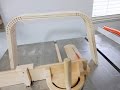
A new shelf on my wall..... I took this photo in my workshop
but will be moving the shelf into my house.
After making the Miter kerf jig in my last video I wanted to make a project
using the jig. A shelf with round corners would be a good test. I didn't know
how hard it would be but I am always up for the challenge.

I carefully marked a piece of plywood using my dowel stop gauge
getting ready to cut the kerfs. The shelf will be 12" x18", and
every corner will have 12 kerf cuts and they will be 1/4" apart.

The first kerf is cut at 8 1/4" from one end. This cut is made
without the kerf jig so it can fit the jig. After 12 cuts the next
set will be 12" further down the board then 18" and so on....

In the last video I tried bending this piece and although it did
bend it started to splinter. To avoid this I needed to add some
steam.

A simple solution for steam is with a kettle. Within a few
minutes of steaming the board bent effortlessly.

I forgot this step ealier but the two ends have to be cut at 45
degrees so they can be glued together. Here I am using my

I thought cutting this might be somewhat difficult but it was no
problem. The blade was set at 45 degrees and a miter gauge was
used.

Some blocks are used to support the frame and to make sure
everything is lined up and square. When everything looks good
I get ready to apply some shims.

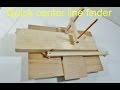
To make shims I will use the table saw. The blade it set at a
slight angle and a bunch of shims are cut. They are cut thin and
random giving me various sizes to fit the many different kerf cuts.

After the shims and glue are dry the excess can be chisled off.
A little bit of sanding and the corners will look nice and this
will be a strong corner and a solid frame.

A shelf is added to the middle giving it a pleasing look. I used
some blocks and wax paper for clamping so there is no mess with
glue sqeeze-out and no marks from the clamps.
Filling, sanding and paint...
I did more filling and sanding then gave it several coats of black spray
paint. I was not happy with the paint, it had primer in it but did not take
well on the plywood. It was suggestted to me from my hardware store.
Over all it turned out nice.
If anyone has any experience with painting plywood please let me know!!

If you enjoy my Youtube Videos and Posts let me know what you think so please comment and don't forget to sign up. Cheers!
See also:

F40B5D88
ReplyDeletekulu esçort
esçort bingöl
esçort manisa
osmaniye esçort
esçort bayan amasya
şirinyer esçort
esçort bayan çankırı
biga esçort
sivrihisar esçort
B5A6ACF5
ReplyDeleteGiresun Esçort
Artvin Esçort
Zonguldak Esçort
Hakkari Esçort
Niğde Esçort
Kırıkkale Esçort
Gümüşhane Esçort
Sivas Esçort
Trabzon Esçort