Sunday, May 31, 2015

Wood scroll holder


                             What to make with my wood pipe?  I did have a plan for what I was 
                            going to build but did not mention it. I came up with this design for a scroll holder
                            because I only wanted to make a project  with one wood pipe. Some people were
                            wondering  what I was going to make  and there was some really good  suggestions.                                                 


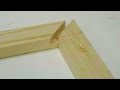
I saved the clamp I used when I first made the pipe and now can use it again to hold the pipe when I cut it with the table saw. With a little set up this can also be done with a jigsaw.


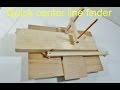
I made a jig for the table saw so the piece can slide back and forth to cut a slot. I used my Stop blocks to hold it in place.


I slowly raised the blade and made sure I did not raise it higher than the threaded rod. This went easier than I thought it would!


    The slot is cut and the ends will be cleaned up with a Japanese
    back saw. The slot is 8 3/4" long and now can hold standard
     8 1/2 x 11 paper.                                                                                                                                            


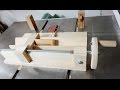
A quick jig a made to secure a dowel to cut a section of it in
half with the bandsaw.


   This will be the roller to hold the paper scroll. It also has a small
   screw to give it some clamping pressure to hold the paper.


For the small circle I used the hole saw since this one has to be exact for a snug fit in the pipe. The larger one I first marked with a compass then cut on the bandsaw. It can be cleaned up later.


Nuts and bolts are used for glueing and clamping  the circles together A larger hole is drilled
for the dowel. I now installed a larger nut and bolt and put it in the drill press.


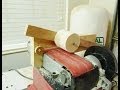
                                My Big sandpaper board is used to clean up and round the edges 
                               of the circles for the end caps.


                           All the pieces are laid out and are now ready for some stain.
                           The wood is from a 2x6 so it is probably fir. The stain is
                           red walnut and I used Varathane for the finish.


   See also:


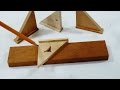
                                Kitchen Utensil Holder      Spline cutting jig           


                                Make a scrap bin            Make a multi blast gate


Thursday, May 21, 2015

Make wood pipes


                                         To see the build check out the video.


Wood pipes can be made with minimal tools. These pipes are made with just a Jigsaw, drill and drill press.

You will also need some glue, clamps, hole saws, nuts and a threaded rod.


To start cut some blocks with a jigsaw, they don't have to be square or exact, just larger than the hole saw you will be using.


The blocks are doubled up and glued together. Only two can be glued at a time. This will work best for the the depth of the hole saw.


After the blocks are glued the hole saw can be used to drill out the centre. Drill one side then flip over and do the other.


The hole saw will give you a center and now the pieces can be clamped together with a 1/4" threaded rod.


So far this is from  four blocks.

I made a Big sandpaper board for sanding.  Even though I made this for this project this is great for other uses around the shop. It has  80 and 150 grit paper.
With the sandpaper board resting on the base and the drill column everything will stay square and you will get a smooth  finish.


Now the next centers can be drilled out. After I did this I was able to make the second pipe.


 The eight pieces  are stacked and checked for squareness. When I find what I like I make a pencil mark and get ready for glueing.


A simple clamp can be made with a threaded rod and some end caps.

Threaded rods can be purchased at any hardware store, they come in 4' lengths and cost only a few dollars.


The pieces are glued and secured with the clamp
 A bearing can be made with a scrap block and a  barrel nut. To make just take the nut and cut the  end off. Then take the other end and and pound it into the block.


Now with the cordless drill place the threaded rod in the block and with the big sand paper board start sanding......
.....the other way is to put it in the drill press. Sandpaper strips can also be used. With a shoe shine method start with some coarse paper and move to finer grits until you get your desired finish.  


Two wood pipes are complete and they turned out great. They are very accurate and I especially like the finish. Using the hole saw makes it easy to make many different sizes.

These pipes are 1 ft. long

Now what can I make using these pipes??   


See also: 
  
      Make large dowels            Table clamp                   Center line finder              Swivel power bar


Sunday, May 10, 2015

My Version of Pocket Hole Joinery


A strong joint can be made using only  screws and a 2x8. No
 glue or dowels are used and after a few tests I show how it can
 hold up the rear and front end of a car. 


See video on how to make and watch some testing.


Pocket hole joinery has been used in piano construction for years. I have seen many 
and just recently took these photos. This is underneath a 100 year old  grand piano, 
and the wood post shown here is a support for the legs.


Here I will show you my version of the pocket hole joinery. They may look different but use the same principle and  require  few tools to make. Since I don't have any of the fancy jigs to make           pocket holes I will do them free hand.

    The tools I will be using are a square, pencil, bit driver, 3/4" Forstner drill bit and a cordless
    drill. The wood is 2x6 fir and the screws are  #14  3 1/2 inch . Clamps may come in handy but
    I have made some without them.  


The basic idea is to use the Forstner bit and after starting the hole tilt the drill 
 at an angle and drill  free hand to get this result. I did it free hand but for this 
 article I measured the angle and it was roughly  15 degrees. 


 Here you can see how the screw will fit the two pieces. The marked line is 
necessary to give the correct distance for the screw so it won't go through the 
adjoining  piece. The size of the Forstner bit, screws and distance will change 
depending on the piece you are working on.


                              I used some clamps to keep everything lined up and put the 3 1/2 inch 
                              screws in. I did  not predrill and drove the screws into both pieces. 


         I flipped it over and now have what looks like a step stool. I put it on the 
         ground and stood on it. I weigh 210lbs and jumped on it and it's solid! I 
         will now have to move onto something bigger.


                               Here I  move on to my next test. I will use the same technique 
                               but this time I will use 2x8 fir and double up the sides and put 4
                               screws in each side instead of 2. With my new Large Compass I 
                               make marks that are evenly spaced and drill them out.


                               I used the same # 14  3 1/2" Robertson screws and drove them into
                               the wood.  No glue or dowels!  To hide the holes some 3/4" dowel 
                               caps can be made and inserted!

                                   
                                         The piece is ready for testing. It feels solid and ready
                                         for some heavy weight.
 
                                             This time I will be using my car.
                           

                                  The rear end...  


                               The front end....I did not want to try this but my kids insisted so 
                               I slowly rolled my car on the block and was blown away that it held up. 


               Another photo of the front end. The car is an Acura TL and weighs 4000 lbs  plus 
               my weight.

               The block worked out great and I did use it again to do a retake  video of the rear end 
               again. Even after all this weight testing it is still intact. I would not crawl under a car 
               with this block but for this test I was very pleased. 

See Also: