
-001.JPG)
A strong joint can be made using only screws and a 2x8. No
glue or dowels are used and after a few tests I show how it can
hold up the rear and front end of a car.
See video on how to make and watch some testing.

and just recently took these photos. This is underneath a 100 year old grand piano,
and the wood post shown here is a support for the legs.

.JPG)
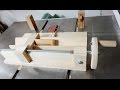
Here I will show you my version of the pocket hole joinery. They may look different but use the same principle and require few tools to make. Since I don't have any of the fancy jigs to make pocket holes I will do them free hand.
The tools I will be using are a square, pencil, bit driver, 3/4" Forstner drill bit and a cordless
drill. The wood is 2x6 fir and the screws are #14 3 1/2 inch . Clamps may come in handy but
I have made some without them.
.JPG)
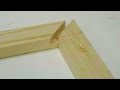
at an angle and drill free hand to get this result. I did it free hand but for this
article I measured the angle and it was roughly 15 degrees.

Here you can see how the screw will fit the two pieces. The marked line is
necessary to give the correct distance for the screw so it won't go through the
adjoining piece. The size of the Forstner bit, screws and distance will change
depending on the piece you are working on.
.JPG)
I used some clamps to keep everything lined up and put the 3 1/2 inch
screws in. I did not predrill and drove the screws into both pieces.
.JPG)
I flipped it over and now have what looks like a step stool. I put it on the
ground and stood on it. I weigh 210lbs and jumped on it and it's solid! I
will now have to move onto something bigger.
.JPG)
Here I move on to my next test. I will use the same technique
but this time I will use 2x8 fir and double up the sides and put 4
screws in each side instead of 2. With my new Large Compass I
make marks that are evenly spaced and drill them out.
.JPG)
the wood. No glue or dowels! To hide the holes some 3/4" dowel
caps can be made and inserted!
.JPG)
The piece is ready for testing. It feels solid and ready
for some heavy weight.
This time I will be using my car.
.JPG)
.JPG)
The front end....I did not want to try this but my kids insisted so
I slowly rolled my car on the block and was blown away that it held up.
.JPG)
Another photo of the front end. The car is an Acura TL and weighs 4000 lbs plus
my weight.
The block worked out great and I did use it again to do a retake video of the rear end
again. Even after all this weight testing it is still intact. I would not crawl under a car
with this block but for this test I was very pleased.
See Also:
No comments:
Post a Comment