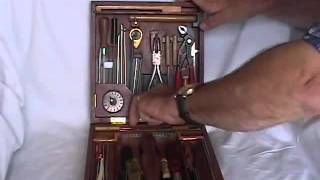
I made a tool caddy for my work bench for easy access to most of the tools I use frequently. This made good sense since I am forever reaching for my tools in different tool cases and then putting them back.
Start by cutting the ends from a piece of solid oak. I still have some hardwood flooring left over so that is what I will use.
For the body three pieces of 2x4 around 9" in length are stacked together but not glued yet. Using a spacer for the middle block I tested the ends to see what looked best.
When I saw what I liked I used Titebond , glued and clamped the body for a couple hours.
Pattern of the ends.
To make a nice shape on the ends I first cut some angles with the band saw and then sanded on the belt sander. I find this way easier than to set up my table saw.
For the curves I first used a Forstner bit then bandsaw and cleaned up with router and some sanding.
The ends are now ready to be put on. I drilled three holes on each end and with wood screws screwed one into each 2x4.
I laid out my tools and with my marking gauge marked where I needed to drill. This way everything stays in line and looks neat.
I drilled the holes paying close attention to the diameter and depth for each individual tool.
Tool Caddy finished and sits neatly on my work bench ready to use.
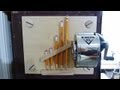
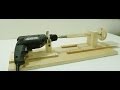
I built this Height Gauge a while back and it works great but now I want to build another gauge for micro fine adjusting. I will use a dial indicator and be able to adjust to 1/1000th of an inch.
To start I use a piece of 2x4 oak and cut a 3 1/2 inch length on my miter sled.
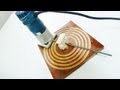
To make a small cove I trace it with my hole saw and will move on to the drill press.
After marking I cut it on my drill press, this can be a bit tricky because it is not a full circle so the block has to be braced firmly.
I did mine by hand but a clamp may work easier.
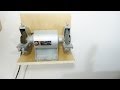
Next I mark and drill the center for the stem of the dial indicator.
With the band saw I notch out the bottom.
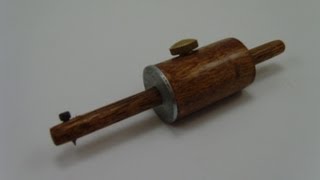
Everything is cut and I put in the dial indicator. A small set screw was installed to keep the dial secure.
A foot was also added to the spindle for more surface to touch the top of the blade.
A wood screw tap is handy when you have to install screws in hard wood or when the pilot hole in not quite right. The tap can be used to make internal threads making it easy to install the screws.
I use it for some projects when I have to repeatedly tighten and loosen a piece, it makes things easy.
A piece of hardwood will split if it is not predrilled.
Here is a sample, one side was drilled and tapped and the other side I just turned in a screw and it split right away. The split side will have no strength at all.
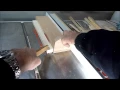
To start I used a 3/16" drill bit for the pilot hole for a #14 x 3 1/2" wood screw.
After a pilot hole is drilled I will make the screw tap.
To make the tap I just grind two sides of the screw on my sander giving the screw some teeth ready for cutting.
The screw should be held with pliers and supported on the base.
Here is the screw tap and a regular screw in some hardwood.
The piece of wood is oak hardwood 2x4 and when the tap is used it creates threads and the 3 1/2" screws turns in really nice even by hand.
Here is another piece I tried in hardwood with shorter screws. First I drilled a pilot hole, ground down a tap and turned in a screw.
I tried the tap on some softwood but it was not necessary although a pilot hole is always important so the wood does not split.
I have too many computer cables and some get lost or misplaced, so I decided to make some wooden labels for them. I will make them is such a way so I can lock them. I will take the cables I use most and lock them on my desk or anywhere I need too.
To start I cut some 17 inch long oak into strips using my ripping jig.
They are cut at 4.17 mm.
On my miter sled I will cut them to length... 2 1/2 inch blanks.
A 1/2 inch Forstner bit is used to make the hole for the lock cable.
I use my horizontal drill for the holes for the cables. Two blanks are stacked and clamped ready for drilling. An 11/64 inch drill bit is used and the cable slides free in the hole.
They are now glued and clamped and set aside. Later I light sand, chamfer the hole and round the corners on a small belt sander all the while watching not to touch the cable.
If ever I need to take them apart they can be placed in the vice and tapped carefully with a screw driver and pried apart. I tried one and there was no problem, although the glue was quite strong.
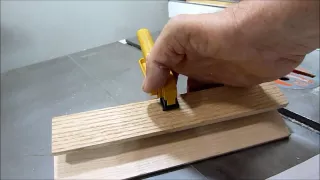
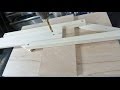
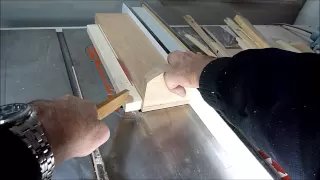
I wanted to make a spline-cutting jig, here is my version of the jig. It can cut 90° and 45°angled splines. The jig is simple and can be made with a piece of 3/4" plywood, 18"x 11" a piece of 2x4 and a hardwood runner for the t-slot. A stop block was added for precise repeatable cuts.
I used a piece of oak for the runner and attached it to the bed of
the jig making sure everything was aligned.
A 2x4 was marked at 45° and my saw blade at the same angle. I cut the length giving me a cut similar to a v-block.
After the block was cut I screwed it to the base and ran it through
the saw at 90° and 45°.
I did not know what kind of stop block to use so I made a u-shaped block that can slide on the block and be clamped to different placements with a c-clamp.
I made a two simple boxes with 3/8" birch plywood. Four pieces are cut on the table saw and glued together. Painters tape is used to keep the pieces together and for clamping......now I'm ready to cut some splines.
With some measurements and use of the stop block the cuts were easily made. I then inserted the splines with wood glue. After they dried I rough trimmed them with the band saw and finally put them on the belt sander and got a clean looking finish.
They now sit proudly on my bench holding my screws. I will make some more and
I may try other angles and and come up with other designs!

.jpg)
.jpg)
.jpg) For the body three pieces of 2x4 around 9" in length are stacked together but not glued yet. Using a spacer for the middle block I tested the ends to see what looked best.
For the body three pieces of 2x4 around 9" in length are stacked together but not glued yet. Using a spacer for the middle block I tested the ends to see what looked best..jpg)
.jpg) Pattern of the ends.
Pattern of the ends..jpg)
.jpg)
.jpg)
.jpg)
.jpg)
.jpg)
.jpg)
.jpg)
.jpg)
.jpg)
.jpg)
.jpg)
.jpg)
.jpg&container=blogger&gadget=a&rewriteMime=image%2F*)
.jpg)
.jpg)
.jpg)
.jpg)
.jpg)
.jpg)
+(2).jpg)
.jpg)
.jpg)


.jpg)
.jpg)
.jpg)
.jpg)
.jpg)
.jpg)
.jpg)
.jpg)
.jpg)
.jpg)


.jpg)